

If you've joined Project Thunderbolt, chances are you are trying to set up a funnel that goes something like this:
- Microsoft Ads
- An opt-in page built with Instabuilder
- Users opt-in to Sendlane, which then redirects them
- An intermediary page to fire a MS Ads conversion
- A final offer page with Maxbounty
In this guide I want to go through these various parts and provide an optimal tracking setup.
I want to be comprehensive to help you learn, not just gloss over things and focus on copy/pasting config. This doesn't help much long-term. So, sorry not sorry for the length of this guide.
Some of this information may differ to what you have in the course -- it has been tailored specifically for this scenario and using the best approaches for reliable tracking with FunnelFlux Pro.
Let's begin!

Preface: Checklist
Here is a "concise" 😅 checklist of tasks for this, and some magic code at the bottom that you can put into the footer section of your Instabuilder opt-in page, to handle a lot of different things in fewer steps!
Your magic code:
Use this to make copy/pasting reliable - https://pastebin.com/DxviSVh1
This should work on most pages (including ones other than Instabuilder), regardless of where you put it on the page. It assumes you have used an event action of "submit_lead_form" in your MS Ads conversion configuration.
<script>
//wait for page to be fully loaded
window.addEventListener('DOMContentLoaded', (event) => {
  //fire MS Ads conversion on form submit
  function GetCustomEvent() { window.uetq = window.uetq || [];
    window.uetq.push('event', 'submit_lead_form');
    console.log('Sending conversion event to MS Ads') }

  //add listener for MS Ads conversion
  let form = document.getElementById('my_form');
  if (!form){
    let forms = document.getElementsByTagName('form');
    for (const form of forms){
      form.addEventListener('submit', GetCustomEvent);
      console.log(`Adding event listener to ${form}`)
    }
  } else {
    form.addEventListener('submit', GetCustomEvent);
    console.log('Adding event listener to my_form')
  }

  //hide the ff_vid field if present
  let ffVidField = document.getElementById('ff_vid_field');
  if (ffVidField){
    ffVidField.style.display = "none";
  }
})
</script>
If you use this code you don't need to add any of the separate codes in the guide below, other than the FunnelFlux header JS and view tracking JS (and the modification to the onDone section in our view JS).

Part 1: Adding Some Resources
First, lets add our resources to the system:
- Traffic Source - Microsoft Ads
- Offer Source - Maxbounty
- Pages - the opt-in page and the Maxbounty offer
This part is quite straightforward since we have templates for the first two.
The Traffic Source
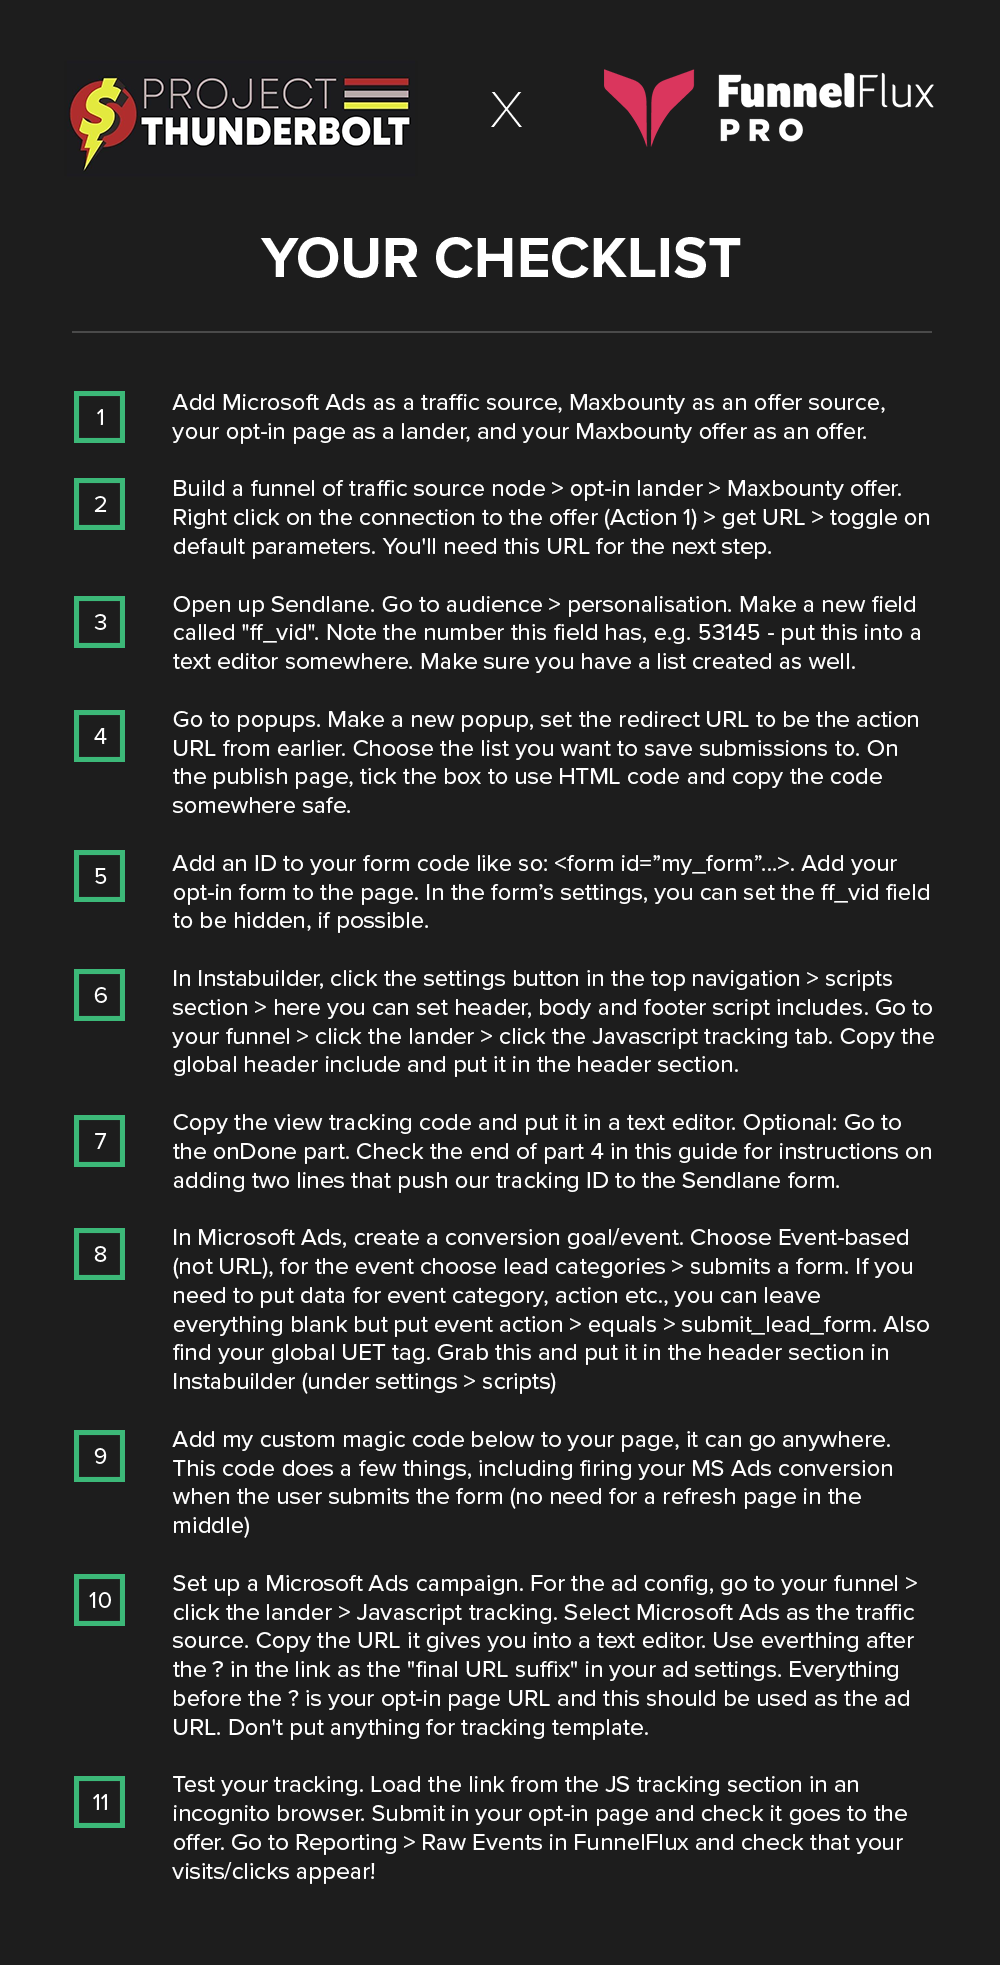
Head to Pages and Sources > Traffic Sources tab > new traffic source. Type "Micro..." and click the Microsoft Ads template that appears in the dropdown.
On clicking it will populate template data, which you can then see in the data passing section (we recently updated our UI, so haven't made that template filling more obvious yet, with some sort of flash/alert):
The conversion tracking tab will have an example UET tag, but this will only be relevant and fired by FunnelFlux if you use our JavaScript for tracking conversions.
With Maxbounty you're going to be using a postback, so you can safely just delete the content under conversion tracking and save the Microsoft Ads traffic source.
The Offer Source
Head over to Pages and Sources > Offer Sources tab > create new.
Type "max..." and click the Maxbounty template.
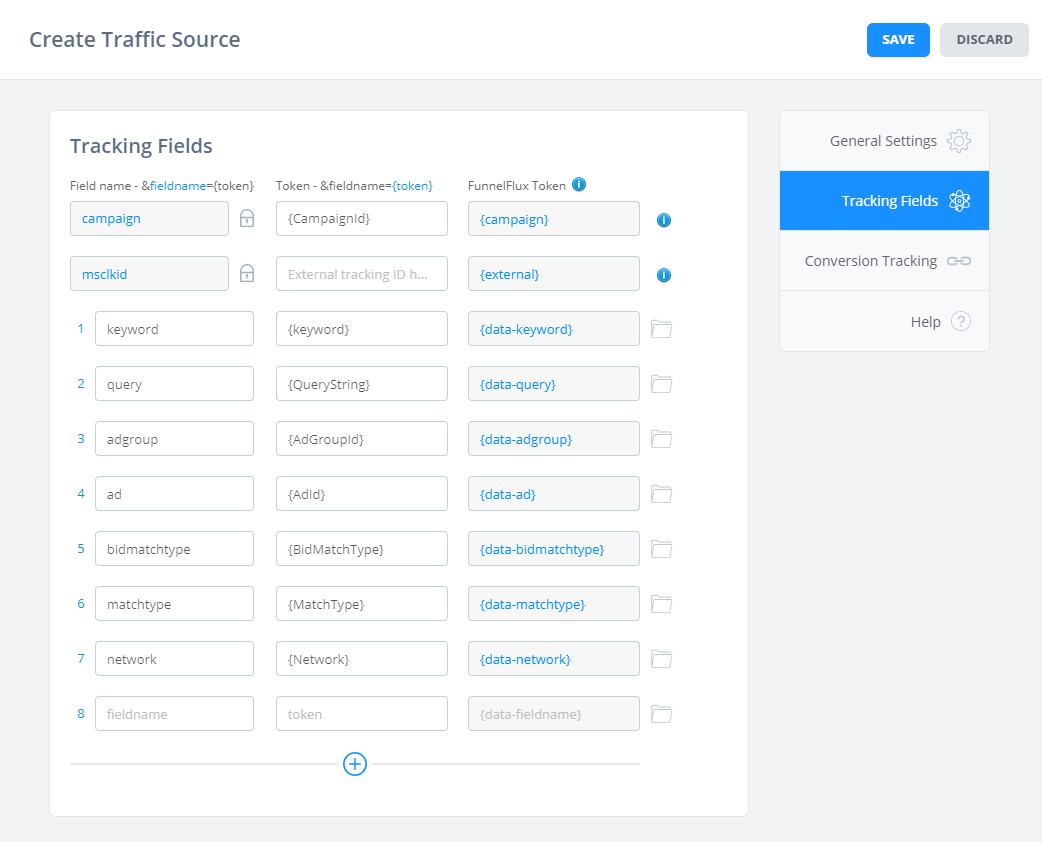
Under the data passing section you should see this:
Here, we are templating the way we will pass data to Maxbounty, based on their link structure. We are passing our important tracking ID, hit, under the "s5" parameter.
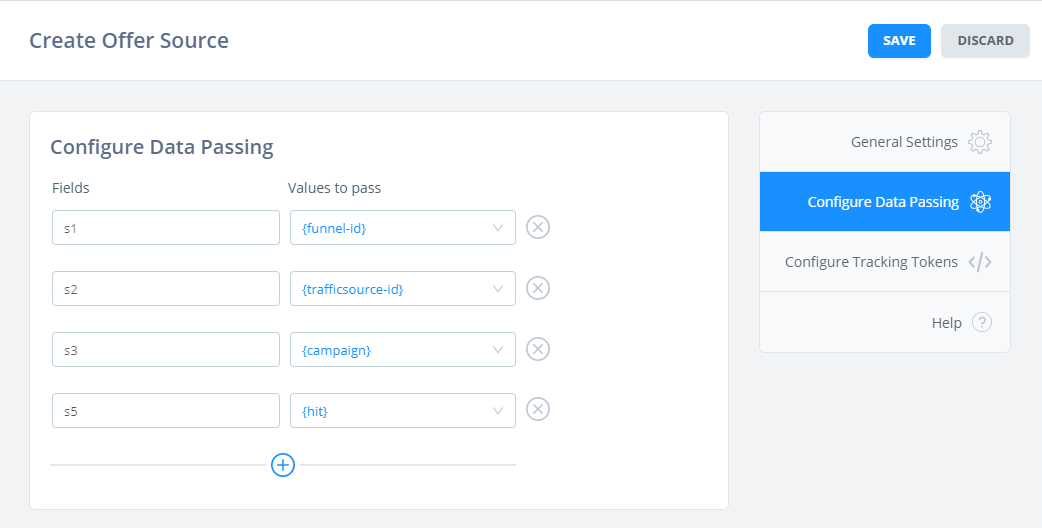
If you click on the configure tracking tokens tab, you should see this:
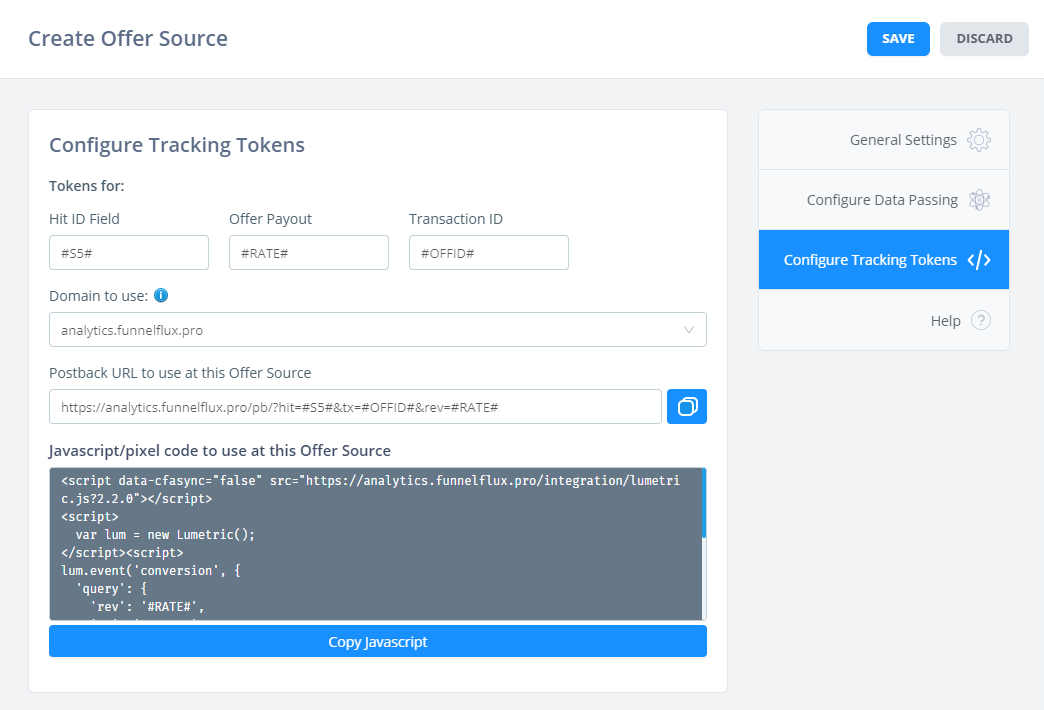
Here we are conversely putting Maxbounty's tokens for that "s5" field, revenue of a conversion, and a value for transaction ID.
Below, you'll see a templated postback URL to use at Maxbounty. You can take this URL now and go place it in the Maxbounty settings wherever needed (e.g. at the offer level, or perhaps account-level).
The Pages
For the simple funnel I'll describe here, you need to add two pages:
- The initial landing page
- The Maxbounty offer
Notice the intermediate redirect page for firing the MS Ads conversion event is missing -- that's deliberate, as we can simplify the flow a bit by using JavaScript to fire it on the opt-in page instead.
For the initial landing page, you have two options:
- Make it a lander. If you do this, it doesn't "convert" and create revenue directly from that conversion (an opt-in is worth nothing anyway, right?). However, it will create clicks. Thus, clicks = opt-ins and clickthrough rate = opt-in rate.
- Make it an offer. Much like the lander, offer clicks = opt-ins and offer CTR = optin rate. You will additionally have "conversions" on this page, and can readily make the clickthrough event itself be a conversion.
Its up to you which one you use, you accomplish the same end results, with some nuances in reporting.
Personally I would make it a lander, simply because I can still see the opt-in rates just fine in reporting, and now know that every conversion is from Maxbounty, not my opt-in page.
So, I'll create a lander with the URL of my opt-in page. I'll leave you to add your opt-in page(s) as you see fit.
I don't need to pass any data in its URL, as firstly our system injects VID on redirect anyway, and secondly using Microsoft Ads, we have to avoid redirect links (as you will see soon).
As for the Maxbounty page, when adding this you'll want to use the minimum unique part of the URL as the "base offer URL" and let our offer source templating do the work.
Go to Maxbounty > get your offer URL. A typical offer URL from a network might look like this:
https://network.com/?a=1234&c=2345&o=3456&s1=stuff&s2=otherstuffUsually, there will be parameters that represent your affiliate ID, the ID of the offer, and maybe another ID for some link variation.
There may also be parameters for passing custom data like s1, s2, etc. or aff_sub, aff_sub2, etc.
These tend to be present if you have entered values into those boxes when getting your link. This is the data we do NOT want in our offer URL in FunnelFlux, as we use the data passing section to template it.
So, when you create an offer, the base URL should only be the part that is specific to that offer, such as:
https://network.com/?a=1234&c=2345&o=3456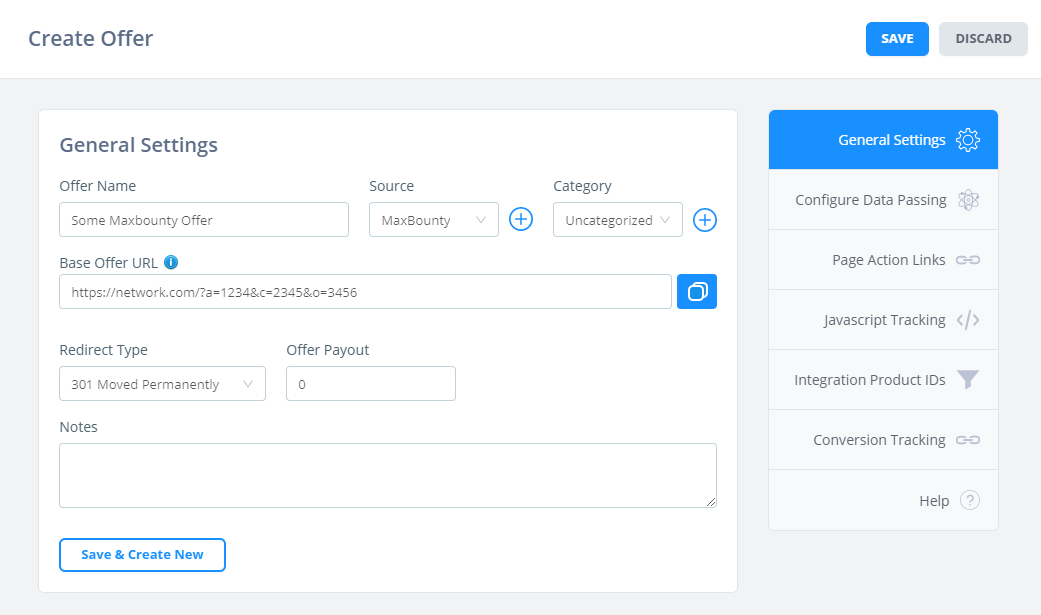
Notice here I chose the Maxbounty offer source and the simple URL I put is in the Base Offer URL box. What does "base" even mean here?
Check the configure data passing section:
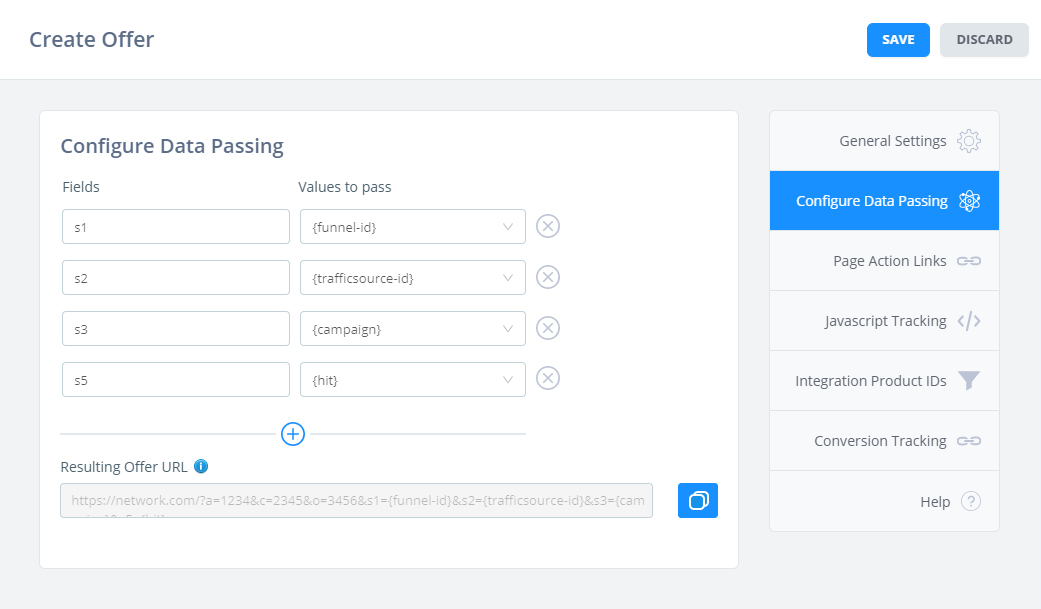
Notice here we have a Resulting Offer URL.
This is the result of the base URL + the parameters defined under data passing.
This lets us consistently tack on the custom data parameters to every Maxbounty URL in the same way every time, to avoid mistakes and ensure tracking works.
That's it for now -- we have our lander and offer, lets' build a funnel.

Part 2: Building the Funnel
Lets' create the funnel for this.
I am going to be using an opt-in page (lander) that links directly to the Maxbounty (offer) page.
I simply open the node palette by clicking the DRAW button, then drag and drop these, or I can right click anywhere to add them.
Click and drag to connect nodes together, giving this:
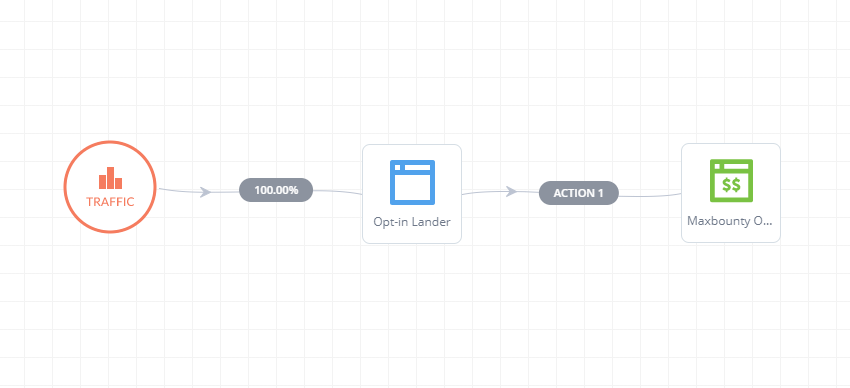
Save the funnel and you're done.
Within this funnel builder we can get a few things:
- You can generate links to use at your traffic source. You do this by clicking any node > get redirect links, or alternatively the JavaScript tracking tab if you want to direct link and use our JS tracking. This is only possible on a page node.
- If you right click any action > get action URL, you will see the action link for this connection. This is the URL you want users to go to when they click buttons on your landing pages, after an opt-in, etc.
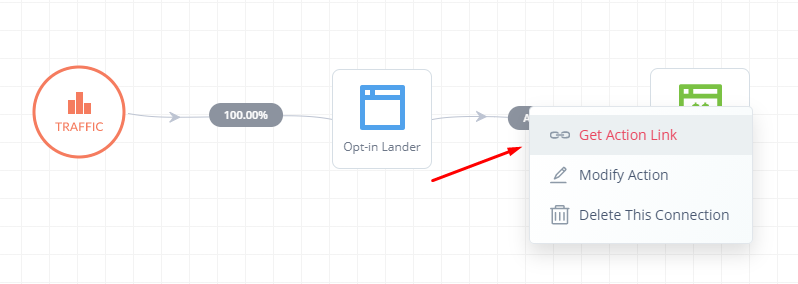
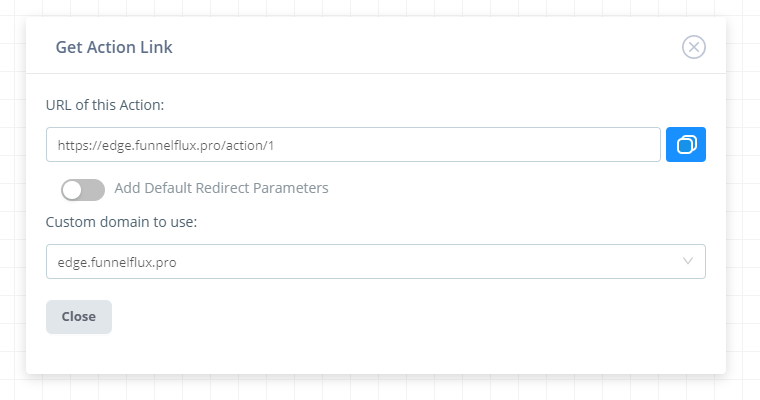
You can get these action links from many places in our UI as they are universal, they are just of the format:
https://DOMAIN/action/numberSo you don't need to always come here to get them, and they are pretty easy to remember.
If you have other pages in your funnel that connect to each other, you should use action links for this and try to have our tracking JavaScript on every page as it makes everything more robust.
The funnel builder is the one place where you can toggle this "Add default redirect parameters" option. This will append extra parameters for the current funnel and the node the action is coming from.
It's important to note that these parameters are NOT overrides and will only ever be used if the tracker has no context -- no idea who the user is, what funnel they are in, where they came from.
Ideally, that would never happen.
But, in your case, since you are doing an opt-in form and have some third-party system (Sendlane) redirecting users to a static URL, this is one scenario where it is good for us to add the default parameters -- because we can't with 100% certainty pass data through the opt-in at the moment, as Sendlane doesn't let us do it.
We'll touch on that in the next part.

Part 3: The Opt-in Form and Sendlane
You're using Sendlane to create a popup opt-in form, which you are then embedding in your page built via Instabuilder.
Firstly, make sure you have a "list" created in Sendlane. Then, head to popups and create a new one. Choose Inline:
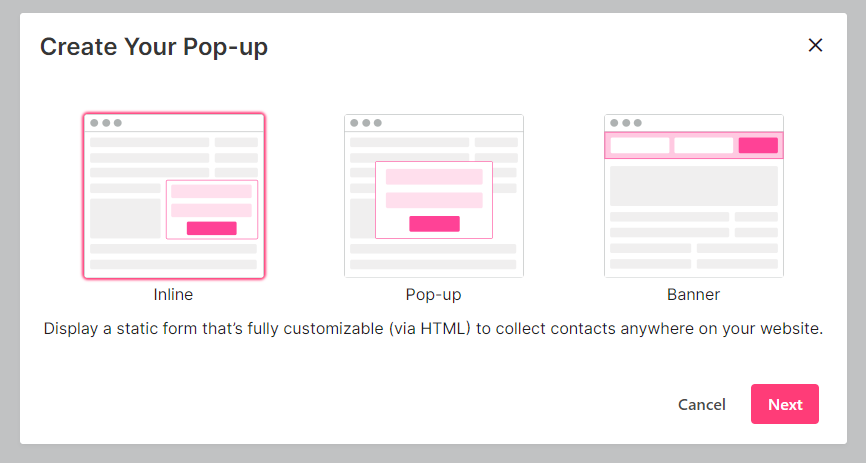
Design your popup as usual.
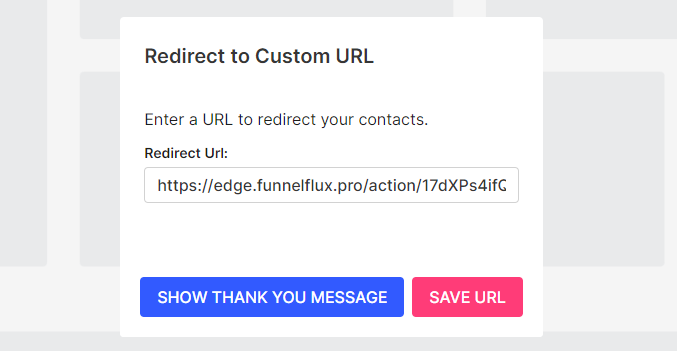
Pick the redirect URL option and put your action link that connects the opt-in page to the offer, ideally with the optional URL params added -- so that if something goes wrong it will at least redirect the user to the Maxbounty offer.
Next > Settings, make sure you select a list to add contacts to:
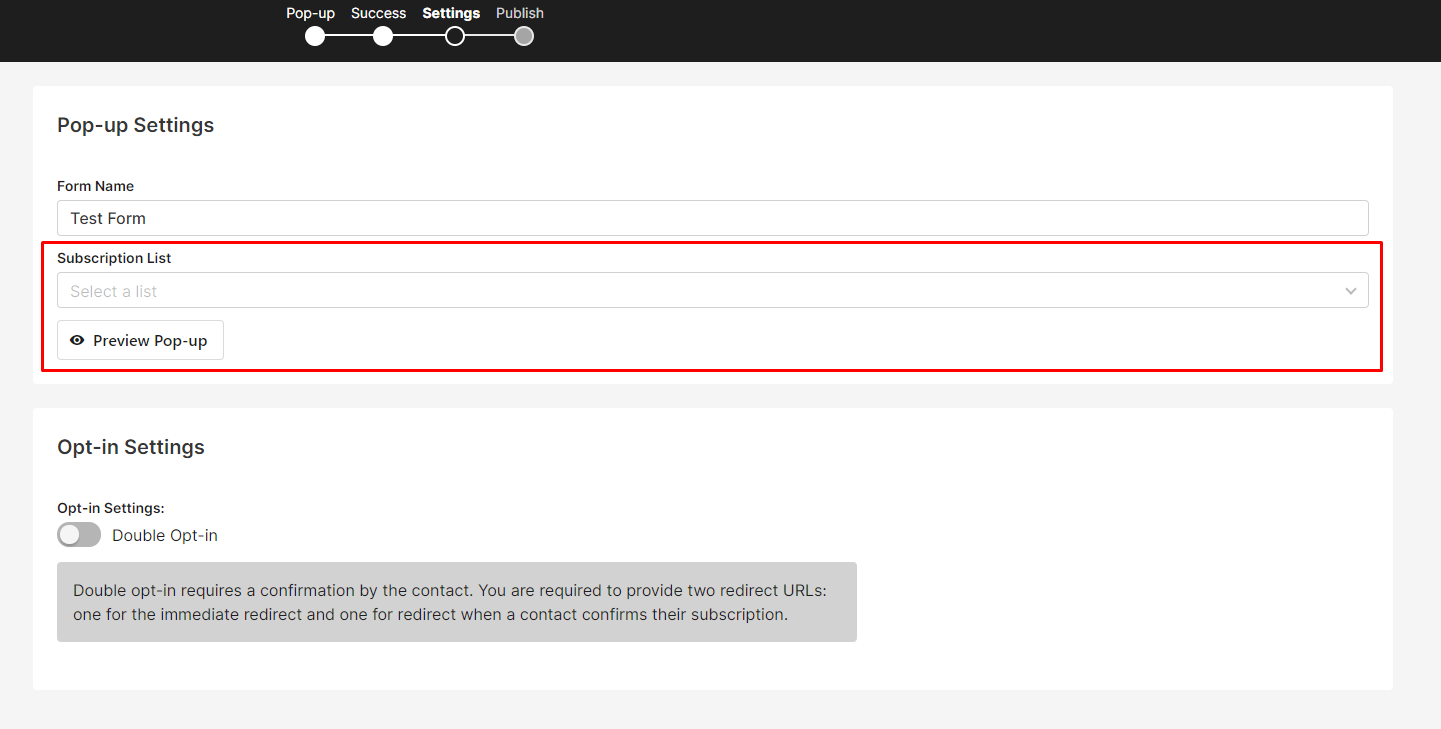
If you don't have one, save the popup > go make one > come back and edit the popup then select it here. If you don't have a list selected, I don't think Sendlane logs your contacts in the audience section, so you can't email them later.
Click next until you get to publish and ultimately get your code, e.g.
<form action="https://sendlane.com/form-api/submission/eyJkb21haW4iOiJmdW5uZWxmbHV4IiwiZm9ybV9pZCI6IjFhMDkwM2IxLTU2NWMtNDU4MS05NWRjLTU1NDgzYWFhMzFjYSJ9" method="post">
<input name="1" placeholder="First name" type="Text">
<input name="3" placeholder="Email" type="Email" required="required">
<input name="53145" placeholder="ff_vid" type="Text">
<button type="submit"> submit</button>
<img src="https://sendlane.com/form-api/impression/eyJkb21haW4iOiJmdW5uZWxmbHV4IiwiZm9ybV9pZCI6IjFhMDkwM2IxLTU2NWMtNDU4MS05NWRjLTU1NDgzYWFhMzFjYSJ9" style="display: none;">
</form>
Here, we should tick the "Show HTML form embed" option as its better that we have the full HTML here, not Sendlane's JS that will process and render the form itself.
Now, go ahead and put this on your page using whatever integration/block is available in your page editor, or just manually placing the HTML code.

Part 4: Adding FunnelFlux JavaScript Tracking
We haven't touched on Microsoft Ads yet, but just know that they prefer if you do not use redirects and so direct-link to your single lander destination.
You can see their policy on this here.
Because of this we will need to use FunnelFlux's JS tracking on the page.
You can get it from the edit lander/offer actions or from within the funnel builder. For your purposes, I would get it from the funnel builder, as we can add some additional context like default funnel/node IDs to the code.
Go to the funnel builder > click the opt-in lander > JavaScript tracking:
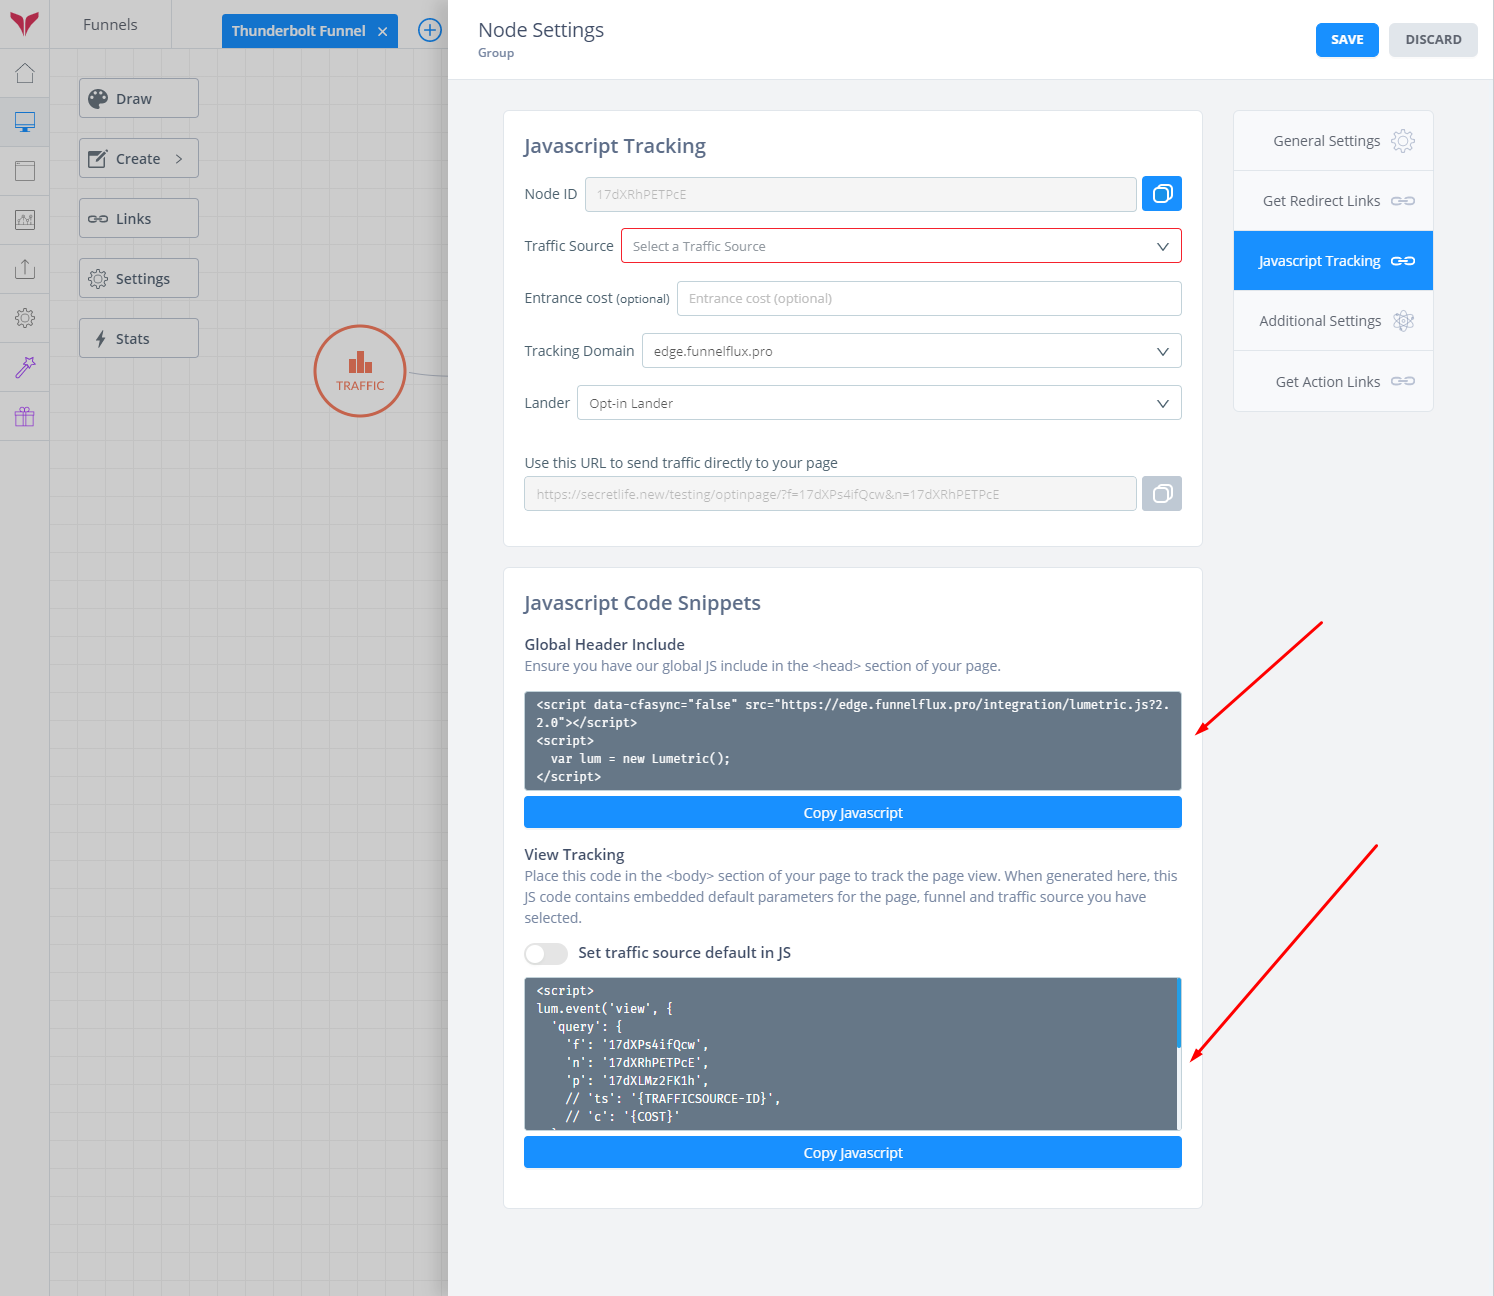
Here you should take the Global Header Include and add that code to the <head> part of your Instabuilder page.
This code can be globally embedded in the <head> of your site as well. There is no harm in having it load everywhere, even if you're not tracking that page, as it just loads some prerequisite JS code (like adding jQuery for example).
The View Tracking code is more specific and you'll want to embed this on your opt-in page directly, in the <body> section. I would put it at the end near </body> so that it executes once all page content is present.
If you add these two codes to your pages, if you then load the live page, you should see a visit appear in FunnelFlux. It will come under the "organic" traffic source because you haven't come from a specific traffic source link.

Part 5: Microsoft Ads Campaign Setup
Microsoft and Google Ads can be a little tricky as they have an atypical campaign setup, where they try to use "parallel tracking" -- which is where they send a parallel request on the side to a tracker, while also sending the user to your page.
If we use JavaScript tracking its kinda useless, so just note one thing: ignore the "tracking template" box in the campaign, ad group and ad sections. This is for parallel tracking and we don't want to use it.
Here's how you'll want to get your URLs and configure things in MS Ads:
- Click on your opt-in lander in the FunnelFlux funnel builder
- Go to the Direct Links tab
- Select Microsoft Ads as the traffic source
- Copy the base URL given, then use it as your ad URL in Microsoft Ads
- Copy the URL suffix and use it as the final URL suffix in the additional ad tracking options. Leave other items like tracking template blank!
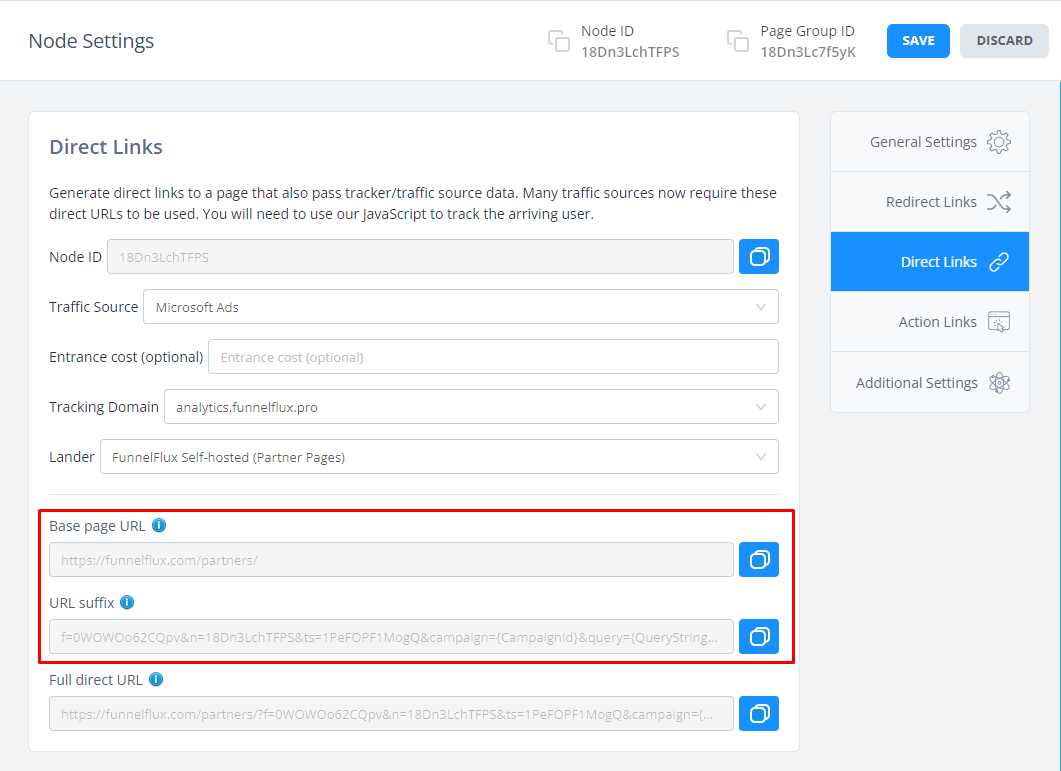
When an ad is delivered to a real user, the resulting URL will be the ad URL + final suffix added together, giving exactly the URL we want and the tokens.
Note that the Final URL Suffix setting may be available at the ad-, ad group- and campaign-level.
You can generally set it at whatever level makes sense for it to then apply to all children. Only set it at the campaign level if every ad group and ad is going to be going to the same page in the same funnel, and likewise for ad groups.
If in doubt, just set it at the ad level every time until you're more comfortable with it.
By the way -- this approach of page URL as the ad URL, then the query string part as some optional appendage, is the same way you would approach things in Google Ads and Facebook. In Facebook the "final URL suffix" is called "optional URL parameters" instead, but in Adwords its all basically identical to MS Ads. The main reason for this is these platforms want you to direct link to a single page they approve, rather than use a redirect link (which allows you to control/change the page after approval, essentially bypassing their compliance processes).
When a user now clicks an ad they will go straight to your landing page and our JavaScript will take charge of tracking the visit.
You can load your direct URL now and, unlike when you loaded the page directly, the visit should now appear as coming from Microsoft Ads (because we now have a "ts" parameter in the URL which tells our JS what the traffic source is).

Part 6: Testing the Full Funnel
Now that you have everything wired up, its important to test it yourself and make sure you're happy with what you are seeing.
Get your full "direct URL" that you would use in Microsoft Ads. You can edit the URL to add test parameters, e.g. take this:
https://domain.com/optinpage/?f=17dXPs4ifQcw&n=17dXRhPETPcE&ts=17diHVwkhNEO&campaign={CampaignId}&keyword={keyword}&adgroup={AdGroupId}&bidmatchtype={BidMatchType}&query={QueryString}&ad={AdId}&matchtype={MatchType}&network={Network}and just simplify it to this:
https://domain.com/optinpage/?f=17dXPs4ifQcw&n=17dXRhPETPcE&ts=17diHVwkhNEO&campaign=TEST&keyword=TEST_KEYWORDOpen a new private browser window, if asked set it to block cookies, then load your direct URL. Don't do anything further yet.
Head over to FunnelFlux > Analytics > Raw Events. Here we can explore what's happening and see a raw log of the hits, clicks and conversions created. We want to make sure its doing what we expect.
As the mantra goes: ALWAYS TEST YOUR TRACKING
In the Raw Events page I suggest setting up these columns/settings:
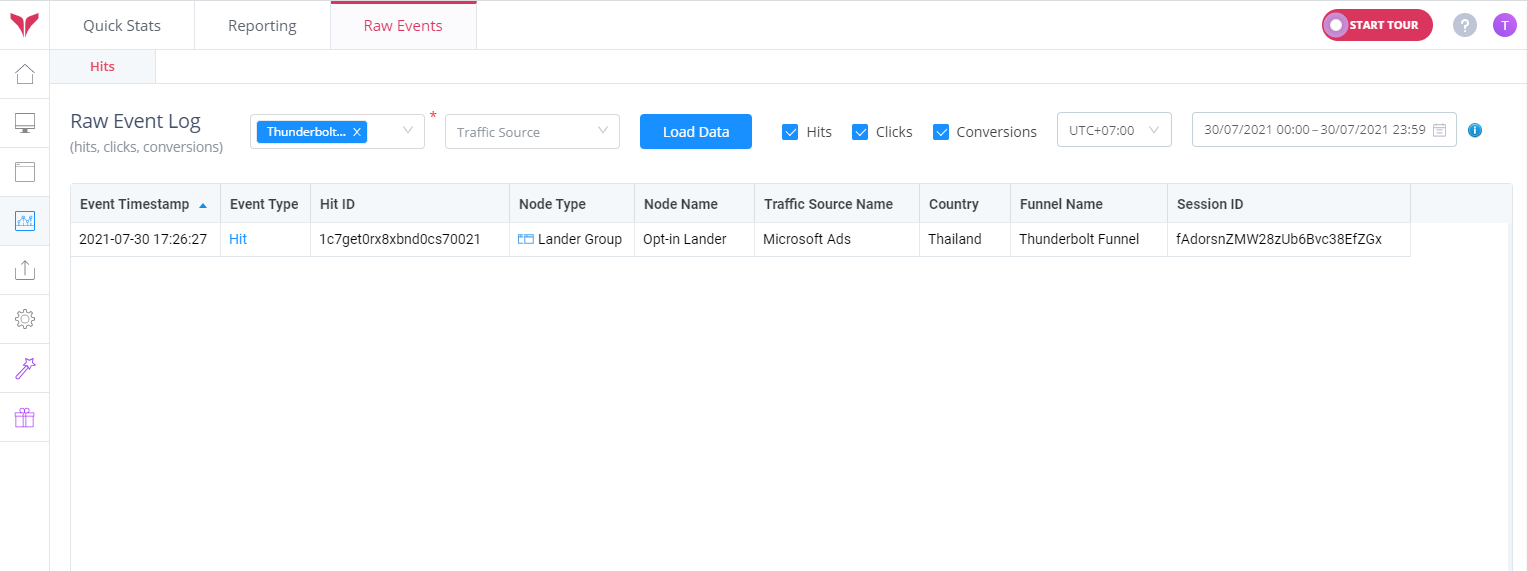
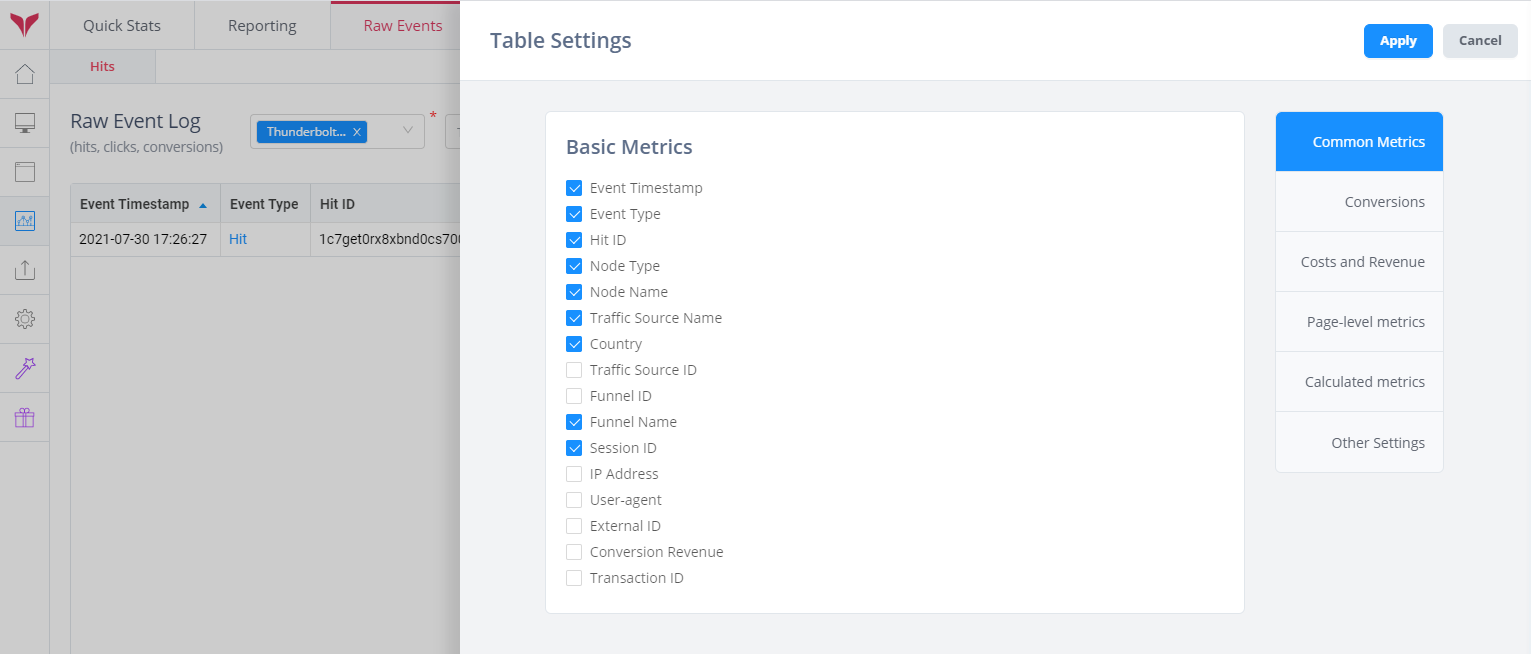
Notice I set the funnel but not a traffic source, as I don't want to filter out any "organic" visits that might appear, and which also point at a tracking issue.
Hopefully on clicking load data you will see your hit from loading the page.
Now, go back to your private window and opt-in to your lander and submit. It should redirect your via the Sendlane form to your action link, then to your Maxbounty offer.
Come back to raw events and refresh the data. You should see a click appear, followed by an offer view to the Maxbounty offer.
But did the traffic source stay as "Microsoft Ads" or did it switch to "organic"? For some of you it may have switched to organic.
If it did, its because the tracker was unable to detect who the user was, as it lost the "VID" value, called a session in the raw events view (you should also notice the session ID changing because of this).
This is because it checked for VID in cookies (found none), checked for VID in referrer (couldn't see a full referrer with a VID in it), and so ultimately didn't know what to do and it fell back on your default redirect parameters in the action link.
If you didn't have those parameters, here it may fail. This is one of the rare circumstances where those params are useful -- in an opt-in form where we can't dynamically control the destination URL 😒
If you used my "magic code", this probably didn't happen, as I have solved some issues for you already. But I detail the fix I do in the next section.
Now regardless of what happened, go to Maxbounty and check your reporting.
You should see the visit appear, and if you add "s5" to the reporting, you should see our hit ID here. This should match the Hit ID you see in the raw events page for the offer view.
Making sense so far? This kind of testing is something you should get used to for most campaigns you run, as tracking is programmatic and prone to mistakes if you're complacent/lazy.
Checking your tracking not only makes you get more and more comfortable with it (like riding a bike), but it also avoids costly mistakes, like dumping $100 into a campaign only to realise you didn't track anything properly.

Part 7: Elegantly Firing a Microsoft Ads Conversion
NOTE: If you followed the checklist and used my "magic code", most of this part is already done -- so you can probably skip to the next part.
You have probably been wondering, what do we do about this intermediate redirect page that I removed?
Well, the Microsoft Ads conversion tracking is just JavaScript right? So we can use our newfound JS wizardry to just fire the conversion when the user submits.
For this we can use some custom JS to fire things when a form submit happens.
Firstly, you will need to put Microsoft Ad's general tracking script on the lander itself, much like our global header include.
You can see their guide on this here - https://help.ads.microsoft.com/#apex/ads/en/56688/-1
This code is not for triggering a conversion, but is just for tracking the page view in general -- its like adding basic Google Analytics code.
What we want to do next is track a custom event using JS. These custom events can be set as a conversion on your side in the Microsoft Ads interface.
Here is Microsoft's help documentation on triggering custom events: https://help.ads.microsoft.com/#apex/ads/en/56684/2
I will let you figure out Step 2, which is done on the MS Ads side.
In the Step 3 section they provide very useful code guidance on how to fire this custom event. Let me draw your attention to this part:
<script>
function GetCustomEvent() {
   window.uetq = window.uetq || [];
   window.uetq.push ('event', 'Replace_with_Event_Action', {'event_category': 'Replace_with_Event_Category', 'event_label': 'Replace_with_Event_Label', 'event_value': 'Replace_with_Event_Value'});
   }
</script>
Here they take the window.uetq.push method, which is what triggers an event, and wrap it in a function "GetCustomEvent()" so that we can fire it at some time later.
Here you should replace the parts they suggest with your event action name, and event categories, labels etc. if needed. Or you could just keep it very simple:
<script>
   function GetCustomEvent() {
   window.uetq = window.uetq || [];
   window.uetq.push ('event', 'submit_lead_form');
   console.log('Firing MS Ads conversion event');
   }
</script>
NOTE: Do not use the above code yet, wait for the full approach below. This is just to explain what we are doing step-by-step.
Note this script should come after the UET tag you put on your page. That UET code can go at the top of your pages.
Now, if we call the function "GetCustomEvent" at some point, it will fire the Form Submit event to Microsoft and trigger a conversion. Sweet.
This push will happen in a few hundred milliseconds and generally will not be interrupted by the form submit, which is going to be much slower anyway as it waits for Sendlane to respond and say "OK, now redirect here".
To fire on opt-in, all we need to do is attach the function to our form. We can do this using through various methods.
A simple way is to add an id="something" value to the form code, but as it turns out, Instabuilder seems to strip this as well as the alternative onsubmit="something" approach used in a previous version of this article.
So instead, we can use an "event listener" that just hooks into the first form on the page. I'll provide two examples -- one for these Instabuilder pages, and for any page where you can edit the form to have <form id="my_form"....> in it.
Modifying the Form
Coming back to our form from earlier, at the start of it we have:
<form action="https://sendlane.com/form-api/submission/eyJkb21haW4iOiJmdW5uZWxmbHV4IiwiZm9ybV9pZCI6IjFhMDkwM2IxLTU2NWMtNDU4MS05NWRjLTU1NDgzYWFhMzFjYSJ9" method="post">
.....
</form>
Here we can add an ID to it like so:
<form id="my_form" action="https://sendlane.com/form-api/submission/eyJkb21haW4iOiJmdW5uZWxmbHV4IiwiZm9ybV9pZCI6IjFhMDkwM2IxLTU2NWMtNDU4MS05NWRjLTU1NDgzYWFhMzFjYSJ9" method="post">
.....
</form>
That's great, but if you save your Instabuilder page and load the live site, then right click > inspect element on the form to look at the HTML, you may notice that the ID is not there! It seems Instabuilder takes control and strips some things here.
So, instead we can generically just hook into every form on the page. This isn't ideal, but it works.
If you do see the ID and can control this, use the second code below. If the ID isn't there, we can use the first version.
Listening to Form Submits
Below, I have code that will do this:
- Look for the form with ID = my_form
- If its found, listen for its submission
- If not found, find every <form> on the page and listen to their submits instead
This script is generic so you can use the same code for both scenarios. It also logs messages to the developer console, so you can open this to see what it does when you load your page.
<script>
//wait for page to be fully loaded
window.addEventListener('DOMContentLoaded', (event) => {
  //fire MS Ads conversion on form submit
  function GetCustomEvent() { window.uetq = window.uetq || [];
    window.uetq.push('event', 'submit_lead_form');
    console.log('Sending conversion event to MS Ads') }

  //add listener for MS Ads conversion
  let form = document.getElementById('my_form');
  if (!form){
    let forms = document.getElementsByTagName('form');
    for (const form of forms){
      form.addEventListener('submit', GetCustomEvent);
      console.log(`Adding event listener to ${form}`)
    }
  } else {
    form.addEventListener('submit', GetCustomEvent);
    console.log('Adding event listener to my_form')
  }
})
</script>
NOTE: again, if you used my "magic code" in the preface, I already have this functionality included, so you don't need to do this again.
Now, remember the mantra? Always test your tracking.
You could try using the UET Tag Helper to test things, or you could open a new incognito window and do the following (just optional testing for you!):
- Open the web developer tools > network tab. Tick the disable cache and preserve logs options
- Filter by "bat.bing" to show only matching entries
- Paste your direct URL (i.e. FunnelFlux tracking URL) in the browser address bar and load the page
- You should see the initial UET tag load and send requests to bat.bing.com
- You should see this bat.bing request loading on your opt-in page in particular, we definitely need it there.
- Now, for the form. Click the little clear button to wipe all entries from the network request list. Clean slate. Now enter a name/email and submit your form. You should see two requests -- one to Sendlane, and one to Microsoft! If you click the console tab at the top as well, you should see our console message of "Sending conversion event to MS Ads" that we put in our function.
- Yay!
By no means do you need to be able to do the above, but its how more technical users would check whether tracking functions are executing.
Now, after this, make sure to go to Sendlane and confirm the submission is there and you can find your submitters in Sendlane.

At this stage, you should be ready to launch a campaign in Microsoft Ads! Good luck!

Part 8 - Checking Reporting
Once you have a campaign running, you'll want to analyse reporting and keep an eye on whether conversions are appearing in FunnelFlux -- of course assuming they appear in your network.
If you see conversions in Maxbounty and don't see anything in FunnelFlux, its time to do some debugging and reach out to our support.
As an initial step, try looking at "Last 7 days" rather than "Today" to make sure its not just a timezone/attribution issue.
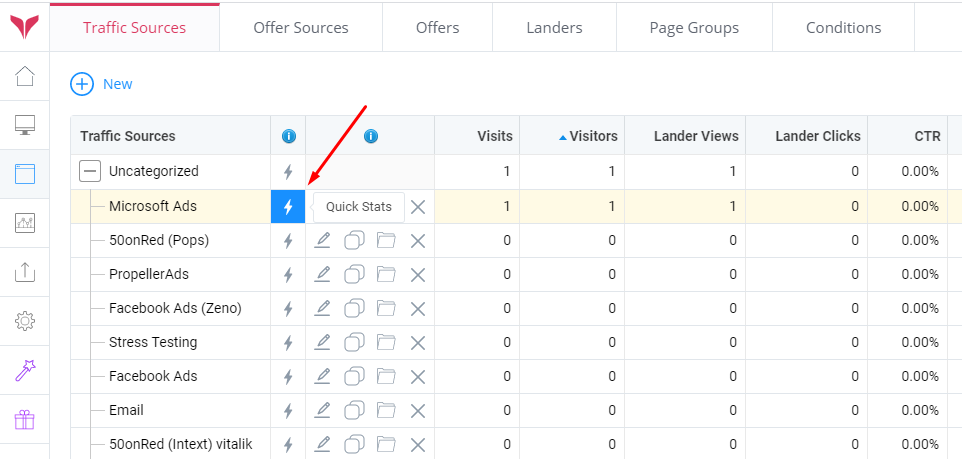
You will likely want to break down by ad data like keyword, ad ID, network, etc. These are traffic source "tracking fields" and can be viewed in tracking field sub-reports as well as in general reporting.
You can open Quickstats for the Microsoft Ads traffic source:
Then load the tracking field report:
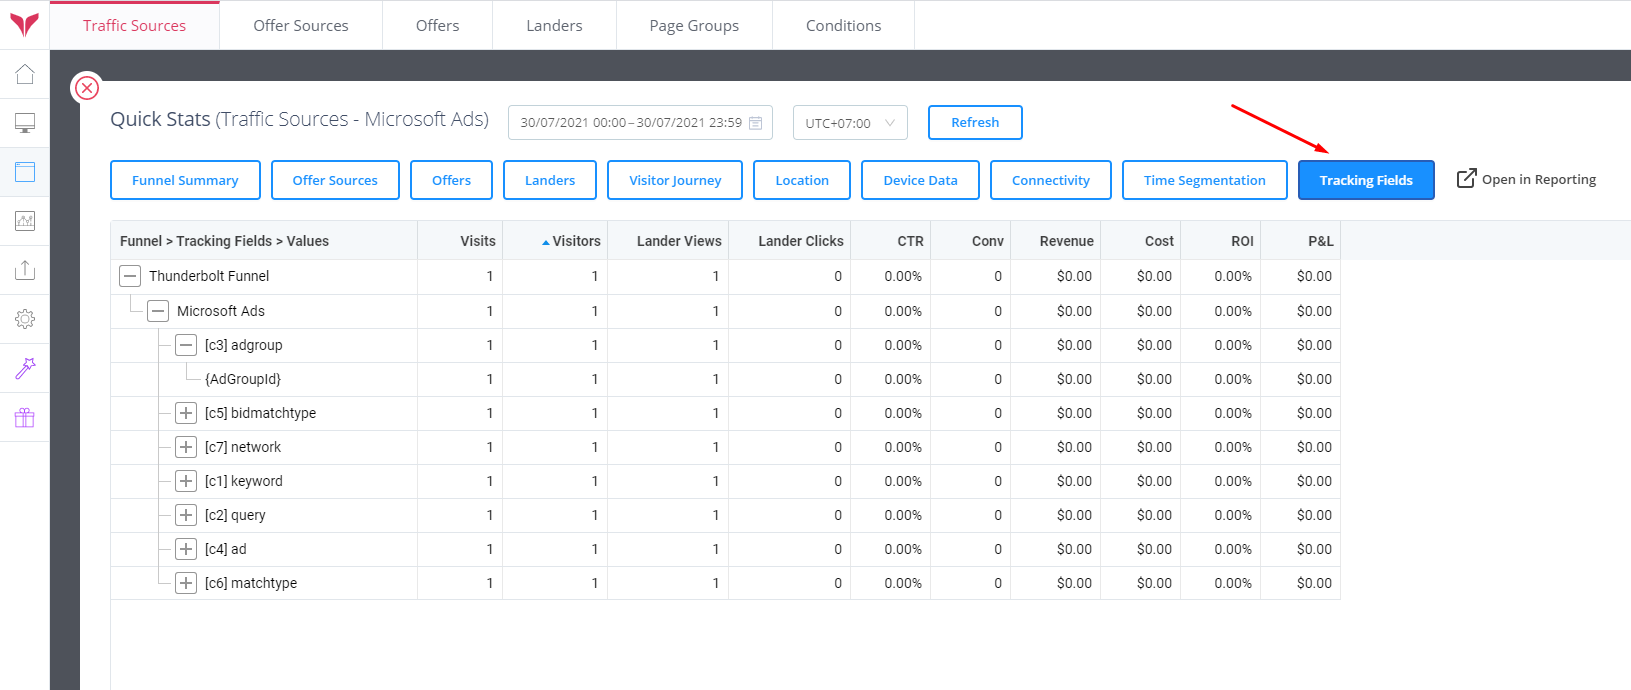
This is the fastest way to get a quick overview.
In the primary reporting section, you can also do a more careful grouping of e.g. funnel then traffic source > tracking fields, a composite grouping we have:
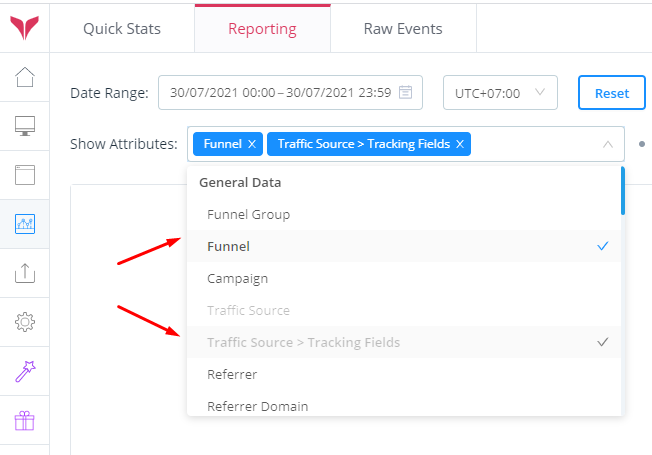
This will give you a nice report like so:
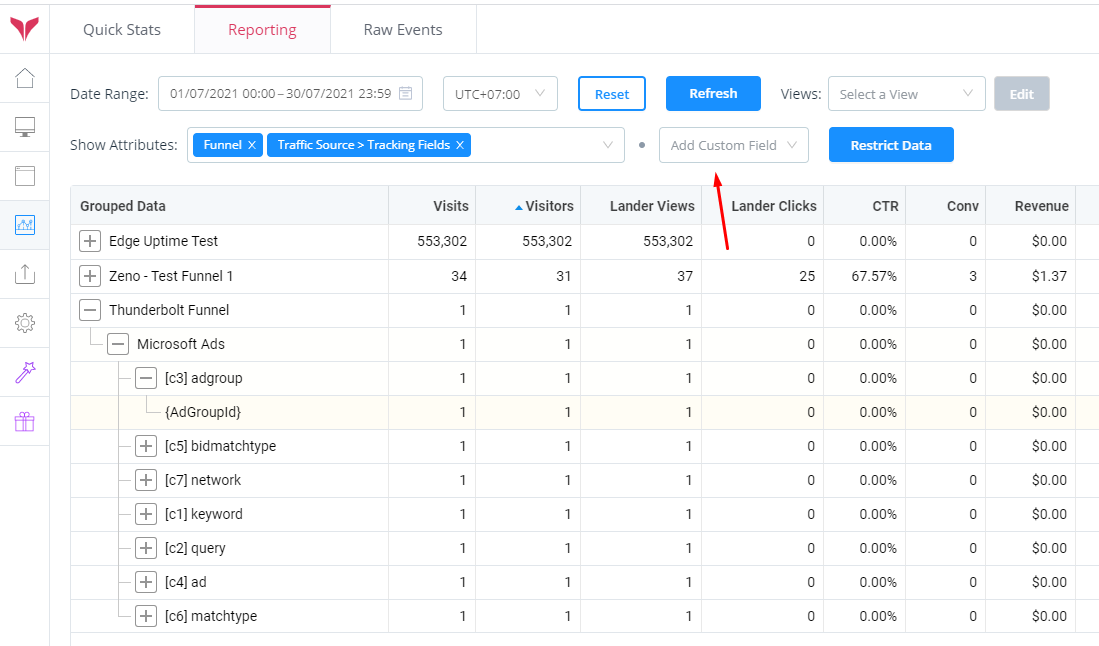
If you want to group by multiple tracking fields in order, you should group by funnel, traffic source, then use the custom fields dropdown marked above to group by multiple Microsoft Ads fields.
Once you pick one, it locks you to that source, as its nonsensical to group users by "MS Ads > ad ID field" followed by "Facebook > ad group ID", since a user can't be from two traffic sources at once.
Now, given the funnel setup we have -- a lander followed by an offer, this is what your various metrics in reporting will mean:
- Visitors -- this is a unique count of visitors, or generated VIDs if you will
- Visits -- this is a count of "entrances" into your funnel by loading links. One user could create multiple visits
- Lander views -- views to your lander page. These are not unique, and the unique counts can be found under the table's column settings (click the little settings icon below the table)
- CTR -- this is your lander clicks / lander views, so in this setup it is equivalent to your opt-in rate
- Conversions -- conversions coming from offers, in this case its only from the Maxbounty offer
- Offer views -- views to the offer nodes. In this case its only the Maxbounty offer, and since each lander click results in an offer view, lander clicks and offer views should be approximately equal
- Offer clicks -- clicks come from someone doing an action on a page, loading an action link. In our current funnel this doesn't happen, so offer links will be 0, and so will offer CTR.
There are a few other metrics you can turn on which you may find useful for analysing your campaigns, and depending on your funnel design.
I suggest going through the column settings and learning about these, as they can be very useful -- stuff like revenue per visitor, conversion rate per visitor, revenue per unique offer view, etc.

Ok, that's it! You should be well on your way to running a Microsoft Ads campaign and having good data and tracking.
This is a long guide but hopefully it answered a lot of questions.
If you have any further questions or find any errors in the document, please feel free to reach out.
See the optional parts below for info on updating costs in the tracker, and tracking out custom visitor ID for later email sequences
-Zeno

Optional - Updating Costs
You might be wondering, what about costs? ROI and P&L, and all cost metrics are useless without this.
Why is it not automatic? How do I make Microsoft Ads pass it automatically?
Well, the reality is, for many sources -- you can't. And you're forced to do manual updates retrospectively to reconcile costs. It is what it is.
Why? Well, it boils down to traffic sources charging you on a CPM-basis. They charge you per impression, not per click. So when a user views your ad, they know the view cost, but whether they click is an unpredictable future event.
When they do click, how do we now calculate cost? Do we build up some cost between clicks and pass that? This would not be representative of the value of that user and would vary wildly.
Do we take some average of the past 24 hours of spend divided by the number of clicks? That would certainly give a more reasonable average click cost, but now it completely disregards that this user could be from a much higher CPM demographic (i.e. cost a lot more). And do we average it per ad or within ad groups? What do we do for the first ever click, or if there are no clicks in the last 24 hours?
You can see this is confusing right? That's because its mathematically nonsensical to pass a click cost value at the time of click for a CPM-based billing model.
Boring theory aside, here's how you can update your costs in a smooth way. Once you get used to it, you'll develop muscle memory for it.
Step 1: go to Microsoft Ads and create a report that breaks down your data for a specific date range (I suggest yesterday, so you can do this daily).
You need a report that shows your ad ID value and then the amount spent in that time range.
Export that report to CSV, Excel, whatever you need.
Step 2: go to our Updates > Update Traffic Costs section.
Select your funnel, the Microsoft Ads traffic source, a date range and a time zone.

Here, make sure the time range and timezone exactly match that of your Microsoft Ads ad account. We need to be looking at the same data.
Above, you can also filter to a specific campaign as well, if you have multiple campaigns and are only updating the cost of one of them.
Step 3: scroll down and select the advanced mode section, then add "ad ID" as a custom field to segment by:

This will update an empty table to have a column for cost and for the value of "ad", which is in our traffic source config as passing Ad IDs.
Step 4: in your spreadsheet, rearrange columns so that you get cost/spend on the left, ad IDs on the right.
Click and drag to select all the cost and ad ID data you want to upload. You can select the headers as well, as you can just delete that row afterwards. Copy the data.
Step 5: go back to FunnelFlux and click in the first cost cell. It should turn blue to show its's selected:
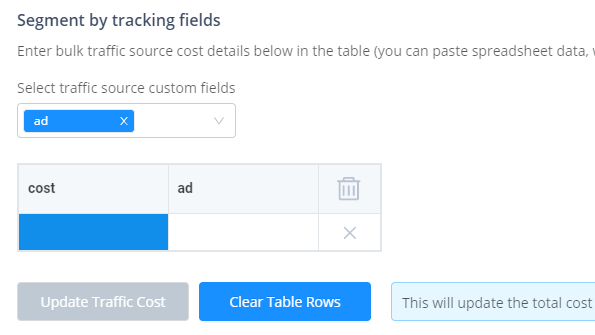
Hit Ctrl + V or Cmd + V to paste and boom! It should put in your segmented cost data. If you have the headers here, you can just delete the row.
If you made a mistake just click clear table rows and try again.
Note: try to keep these updates below 250 rows at this stage -- if you try to submit thousands, e.g. segmenting by other, more specific IDs, the cost update may fail (we will improve that later).
Click Update Traffic Cost and you should get a notification that the update was submitted successfully.
Your cost data will start updating in the background and should only take a few minutes at most, depending on how many visitors and time it covers.
These updates can be done at any time, so don't worry about making mistakes -- you can always just do an update again. However, wait until previous updates finish before doing a new one, to ensure you don't have two of them competing to update the same data.

Optional - Tracking VID in your Form
In Sendlane we can set things up to capture the unique user ID (VID) that FunnelFlux creates, as later when you send other emails, the ID will help you attribute revenue back to your original funnel/ads.
That's hugely important if you plan to monetise users over a longer period of time, not just a single conversion attempt, and want to know how your ad traffic is backing out over the longer term.
Head over to Sendlane. Go to the audience tab, personalization, then create new custom field:
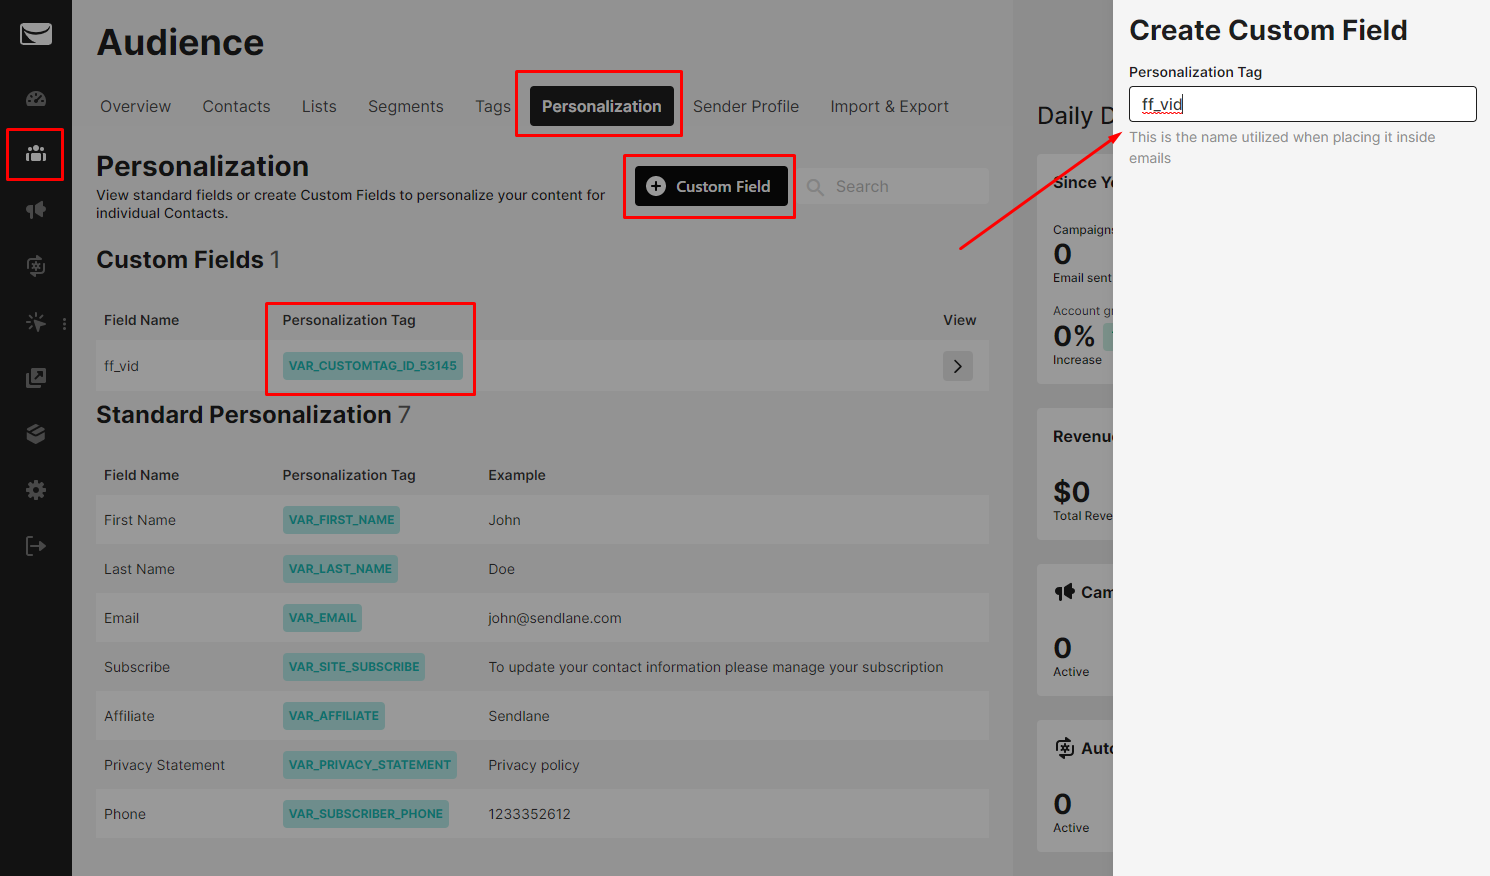
Call it "ff_vid", short for FunnelFlux VID.
When you create it, it will appear in the custom fields list along with a tag. Mine is:
VAR_CUSTOMTAG_ID_53145This is what you can use in later emails to pass along a stored VID value for a user (which I will mention in the last part, since its a future issue).
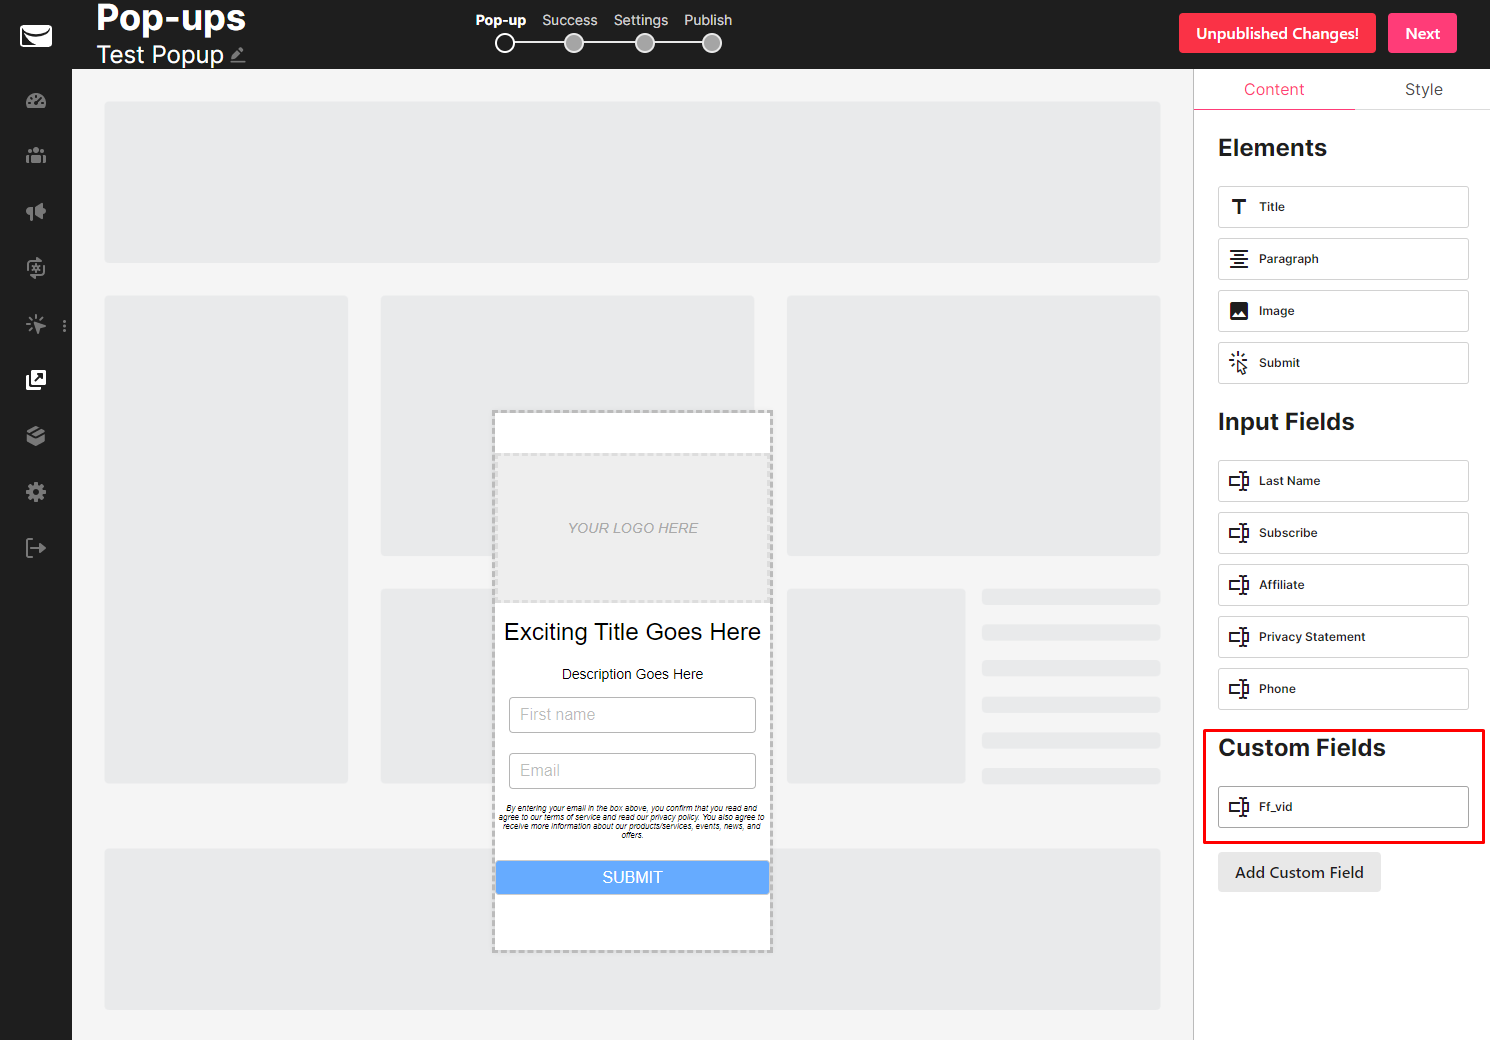
Design your popup as usual. You can then drag and drop the ff_vid field as well, to add it to the form:
NOTE: In Instabuilder, I believe you may also be able to configure fields there, where you can also set them as hidden. This is ideal -- we want this ff_vid field to be part of the form but we actually want to make it invisible to the user!
I don't have access to Instabuilder, so I am going to take a generic approach that will manually hide the field using JavaScript, which you may not need to do.
You may be able to add it to a form there and set it hidden, like so:
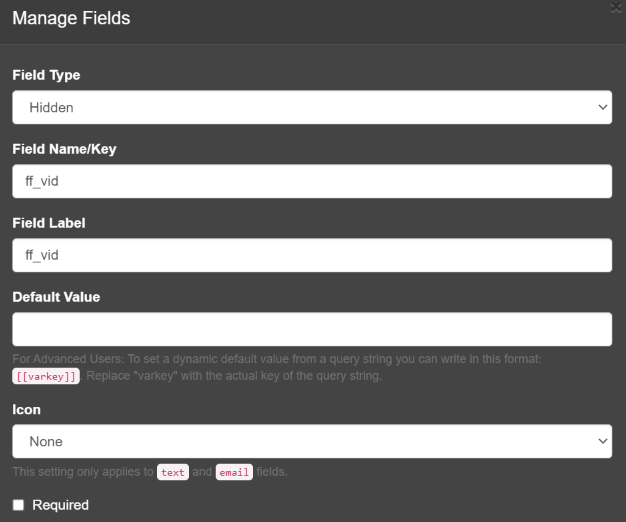
That aside, we simply want ff_vid to be a part of your opt-in form, by whatever means.
When the user submits your form, they should appear in your Sendlane account and have a real value saved under "ff_vid" that we can use later, great!
Remember our custom redirect URL for the popup?
Here it would be awesome if we could pass our VID through the form and directly into this URL. That's exactly what we want to ensure data passing that does not rely on cookies/referrer.
However, I asked Sendlane and have confirmed that putting e.g. "VAR_CUSTOMTAG_ID_53145" into this URL will not result in it putting our ff_vid form value here... no dynamic tokens here unfortunately. Damn.
Anyway, get your form code as usual, in HTML format, and add it to your opt-in page.
In the form code, you should see some part like this:
<input name="53145" placeholder="ff_vid" type="Text">Note here the name value of "53145". This will differ for you.
Now, we can easily modify this form input.
We want to do two things with it:
- Inject the FunnelFlux VID value into it
- Hide it from the user
The #1 operation here requires our JS to process and return a visitor ID value, the second could be done at any time -- so its ideal we do it as soon as possible.
It's already included in my "magic code" in the preface, but here is how I do it below if you wanted the specific code.
<script>
window.addEventListener('DOMContentLoaded', function () {
   document.getElementById('ff_vid_field').style.display = "none";
})
</script>
Pretty easy to read right? Basically says "get this field" then "set it to display:none" to hide it.
Next, in our FunnelFlux JS, we need to inject our VID. But we need to make sure its available first. We do this by leverage the "onDone()" function in our view tracking JavaScript. You will need to do this modification yourself in a text editor, but its very easy.
The view tracking code might look something like this:
<script>
lum.event('view', {
  'query': {
    'f': '17dXPs4ifQcw',
    'n': '17dXRhPETPcE',
    'p': '17dXLMz2FK1h',
    // 'ts': '{TRAFFICSOURCE-ID}',
    // 'c': '{COST}'
  },
  'options': {
    'cookieAllowed': true,
    'urlRewrite': true,
    'timeOnPage': false,
    'resolveTokens': [],
  },
  'onDone': function (response) {}
});
</script>
Paste this in a text editor so that we have more space to safely work.
We are then going to add a few lines of code inside the curly brackets of the onDone function.
We will change this:
'onDone': function (response) {}to this:
'onDone': function (response) {
    let vid = response.resolvedTokens['{visitor}'];
    document.getElementsByName('53145')[0].value = vid;
}
In my above example the name used is "53145". This is the number of the field in the Sendlane form, which is also the number that appears in the ff_vid personalisation tag you created.
Makes sure you update this number above to what it is for your form.
Also make sure the syntax is correct and you're not missing the opening and closing curly brackets here.
NOTE:
If you can access the form HTML to add an ID, we can use that instead, which is more specific and reliable. So you could add <input id="ff_vid_field"....>
'onDone': function (response) {
    let vid = response.resolvedTokens['{visitor}'];
    document.getElementById('ff_vid_field').value = vid;
}
Using an ID you have manually added to a field in a form is a better general way of doing things, in cases where you have better control over page elements. But for some platforms like Instabuilder, they may remove these manually added IDs...
So, here we are doing two things:
- Getting the value of VID from our tracking's "response"
- Setting the value of our opt-in form ff_vid field to be equal to that vid
And that's it! The form should modify within a few hundred milliseconds of loading the page, the form will be hidden, and our VID value will inject into it.
You can test it yourself with opt-ins and see whether the users created have a clear ff_vid value attached to them. See the next section for how we would use these.

Optional - Longer Term Email Funnels and LTV
Earlier we have captured "ff_vid" but haven't really used it, right?
Well, we can use it in later emails to link activity across funnels.
If you want to later send emails to users to try and convert them on other offers, send them through different funnels and flows, try this approach:
- Create a new traffic source called "Sendlane Emails" or similar
- Set tracking fields for this and tokens that are available. They call them personalization tags and you can set up which ones you want to capture in email links.
- Create separate funnels for your email campaign activity that determine the flow of pages, treat them here like a standalone funnel from others
- When you generate links for users in these funnels, use the traffic source you made above -- after all, the user is now coming from Sendlane, not Microsoft Ads or any other
- Since these funnels are linked, i.e. we know that users in the email funnel may have come from the Microsoft Ads funnel, we can LINK them. You can do this by going to the settings of the MS Ads funnel > advanced settings > linked funnels, and adding the email funnel(s) here. This is a one way linkage, you need to link to downstream funnels. Don't add the MS Ads funnel as a linked funnel in the settings of the email funnel
- Now, in the links you use in Sendlane, we want to pass VID along with the stored value we captured for the user, if available. This will tell FunnelFlux to look for that visitor's session/ID and if found, connect their activity.
- If the user converts in the email funnel, an indirect conversion can then be created in the original MS Ads funnel, giving you a measure of the longer term value that the funnel is bringing.
Here's how I would set up my Sendlane Email traffic source:
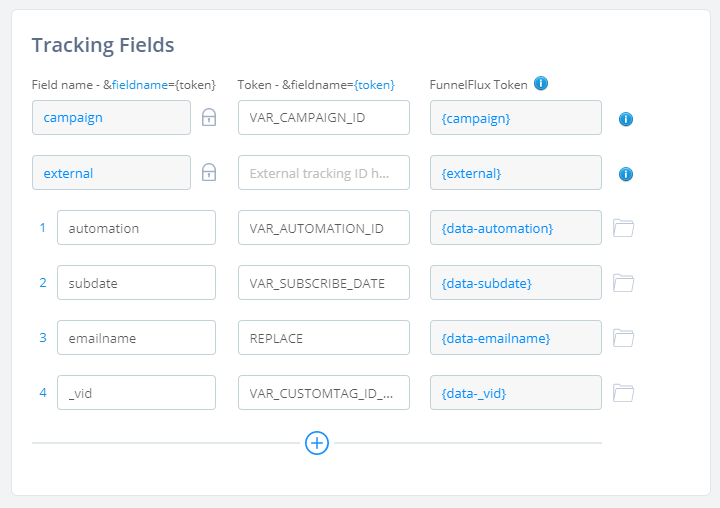
Notice here I have put _vid -- this is because vid is a reserved field name so we don't currently let you use it directly here.
So, when you generate links for Sendlane, you'll just need to manually remove the _ from it to make sure it passes ...&vid=xxxxx in the URL.
The placeholder I have is the value Sendlane gave me for the custom field ff_vid that I created. It will be of the form VAR_CUSTOMTAG_ID_XXXXX.
I also saw no tag for email ID/name, though campaign ID might be the email ID.
Personally I would like to pass a short label for the email as well e.g. "retarget_angle1" or similar, so I added 'emailname' with a value of REPLACE so that its easy to remember in the generated link that you should change this value to something sensible for yourself. You'd need to do that every time you use it in an email, just like removing the underscore from vid.
You could also pass subscriber email and other things here, but keep in mind any GDPR and other compliance requirements on your side. Email, name, and so on are personally identifiable information (PII) so you should avoid passing them into some third party system without consent, and when not needed, unless you know its safe to do so.
We won't police this, but its up to you to be mindful of any obligations you have on your side, risk etc.
Now, heading back to the original MS Ads funnel:
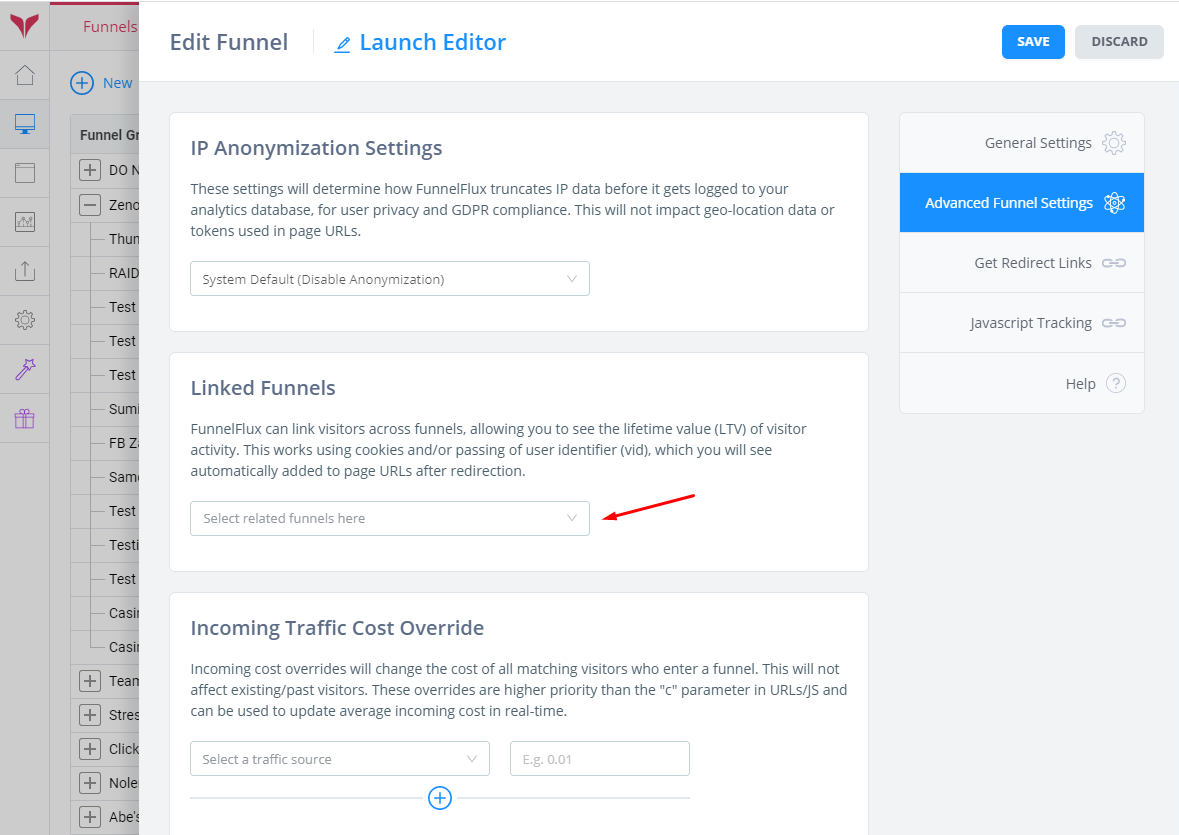
Here you can add the email funnels as downstream linked funnels.
Provided you pass VID into the generated links you use in the email funnels, all going to plan when someone converts in that funnel, it will pass an indirect conversion back to the MS Ads funnel.
You will see this data in reporting under our indirect and lifetime-related columns:
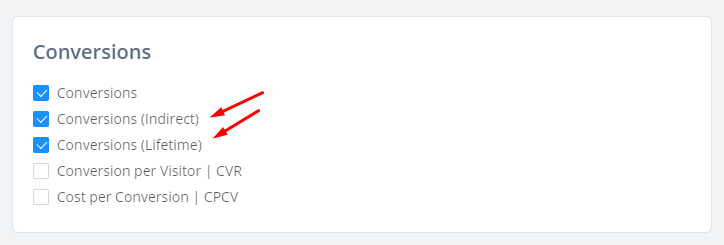
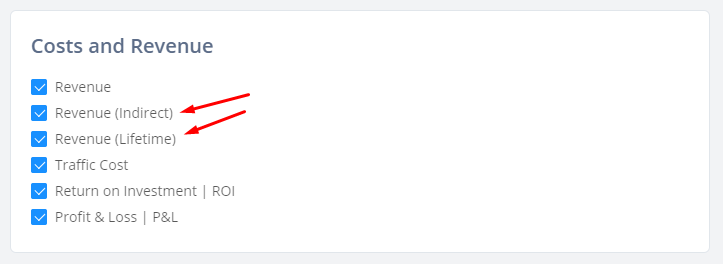
Conversions and Revenue are direct metrics, so they only occur for conversions with in the current funnel.
The (indirect) label denotes conversions/revenue that have been passed from a linked funnel back to this one.
The (lifetime) label just means the sum of the direct and indirect. It doesn't actually mean "across all time" for the visitor, as your reporting query happens across a specific time window right?
We may change the way this lifetime reporting works in the future -- for now its in the current range, so you may need to expand reporting windows to capture the full scope of the user's revenue generation.
In the future we may add an option to attribute all indirect conversions back to the visitor creation time, so that all revenue data appears on the single day you tracked the user entering. To be honest, some people want it one way, others another, so there's no pleasing everyone.
Also, our ROI calculation is based on lifetime revenue, not direct revenue only. In most cases your indirect revenue is zero anyway.