

Hi!
Zeno here, writing this guide exclusively for members of the 123 Profit program.
Below I will go through getting set up from start to finish as a new member.
My assumptions are that:
- You have a custom domain already, and it's probably managed in Float Hosting
- You are using Float Funnels
- You are using Sendpad
- You are using Microsoft Ads
- You are using an offer from Maxbounty
- You don't have too much experience with a performance-marketing tracker like FunnelFlux Pro
To organise things better this guide will be split into different parts, and I will give video guidance in each part.
So, let's go!
Setting up a custom domain
Before you start using FunnelFlux you need to add a custom domain to the system.
We don't provide these -- you will need to purchase your own domain to use for landing pages, tracking, and so on.
These custom domains are what get used in the links and JavaScript we generate.
I'm going to assume that you have already bought a domain and it's managed in Float Hosting or Cloudflare.
Below is my video where I will run you through adding your domain in FunnelFlux Pro, then adding the needed records in both Float Hosting and Cloudflare, depending on which one you decide to use.
If you're familiar with DNS in general and are using a different setup, you can instead check our general custom domain guide here.
Note: Since this video was made, we have updated our domain settings UI to make life easier. You don't need to worry about the record names not working in systems other than Cloudflare -- you can just copy the name and values directly to any DNS system as is.
Setting up your offer source and offer
Now, let's get on to filling out your FunnelFlux account with the resources it needs.
Before creating funnels or launching campaigns, you need the basic assets that create these, namely:
- A traffic source, which defines where users come from and what data to capture (e.g. MS Ads)
- An offer source, which defines where your offer pages are sourced from (e.g. MaxBounty)
- An offer, which is an individual page you will redirect traffic to (e.g. an affiliate offer from MaxBounty)
- Landers, which you'll use in your funnel
Below I go through how to add MaxBounty and offers to the system, a MaxBounty offer, and setting the postback URL.
Note: Some Maxbounty offers have different options under the pixels/postback part. Make sure to use the "URL" option. Don't use the iFrame/HTML option as it is not what we need (and it confusingly mentions "server" for this option, even though its not the server-to-server tracking we want. Pick the URL option.
Adding landers
Now let's add your landers from Float Funnels to the system.
Creating and embedding a form with SendPad
You're likely using SendPad for the opt-in form.
Here I go through making that form and embedding it in your opt-in lander.
We will deal with configuring its link/redirect settings in the next video, as I want to do all of these in one sweep.
Creating a basic funnel and implementing tracking codes/links
Now let's wire together a basic funnel and add the tracking we need -- which is action links that connect pages together, and our universal tracking JS that helps to track in general but is also critical to direct linking.
- When I updated question page 2 (to fix the title), it still showed question page 1. This was probably just caching that would have figured itself out in a few minutes, so don't worry about that
- In Float Funnels, it wasn't letting me paste full code in the header/body/footer boxes -- I believe Float Funnels fixed this issue
- The SendPad form opened up a new tab when I was testing. I believe SendPad also resolved this issue post-video
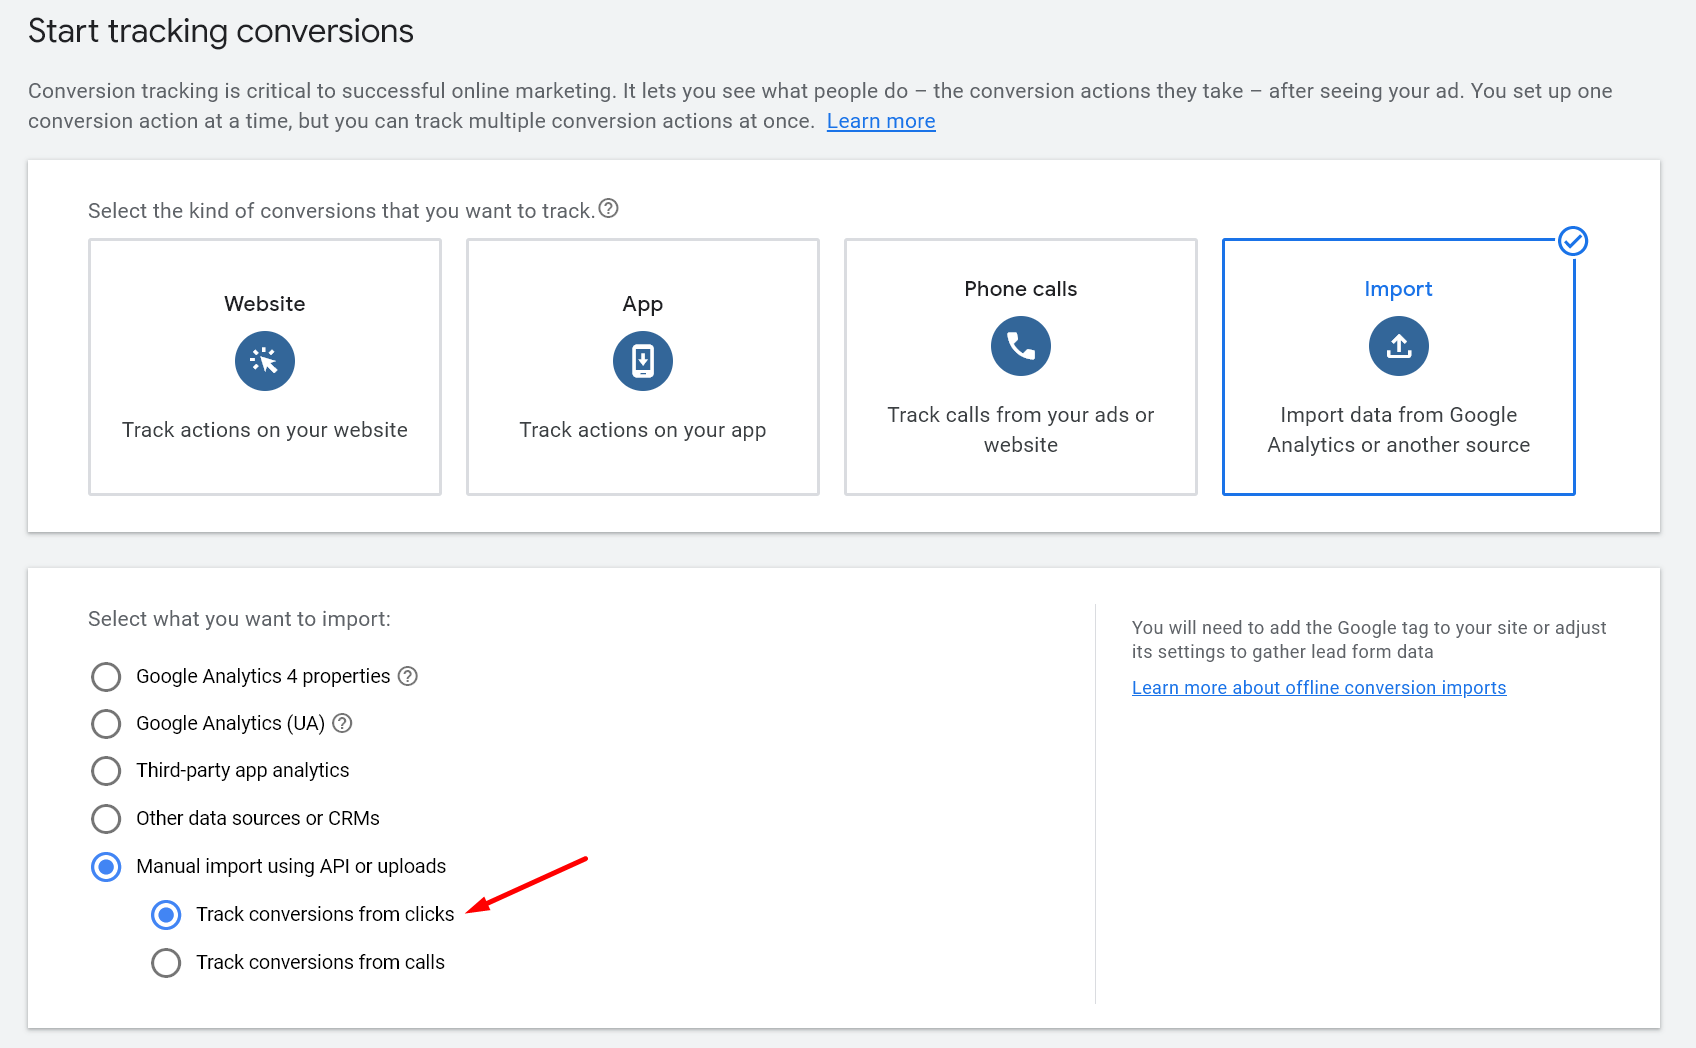
Adding Microsoft ads and configuring conversion tracking
Let's add our last asset -- a traffic source.
Additionally, we will deal with the conversion tracking side, which can be a bit tricky to set up initially (but is well worth it to properly track offer conversions with MS Ads).
- For the conversion goal name in the custom scenario config, use the full text name that you used in MS ads. For example
My Lead Submit Goal Name. Oddly Microsoft requires us to send the ID and the name in our conversion events (even though they surely only need ID...). In the video I use "Purchase" but this is not correct -- at the time there was a UI bug stopping me from using spaces, so I mistakenly assumed it must be wanting GoalCategory input.
Tracking opt-ins with MS Ads
It would be great if we could send opt-in events to MS as well... we can! And there's a much better way than using a refresh page.
We can instead add JavaScript to the opt-in page and trigger a conversion goal on submit.
Notes from this video:
- Put the code I provide at the end of the page, not the beginning like I did. If the header/body/footer includes are working once you see this video, you can put in the footer section there. Otherwise use custom code but add it after the form.
- SendPad updated their form since I made the video, so I have updated links below to new JS. Right now it triggers on clicking the submit button. Hopefully with some later updates by them, we will be able to make it fire only on valid form submission instead
Here's the magical JS code that will handle things for you. Note it assumes you picked Submit Lead Form as your goal, which uses the submit_lead_form event in code.
Click HERE to get the code snippet
Doing the same with Google Ads
If you would like to do the same thing but with Google Ads, here's a combined snippet that fires both MS and Google events - HERE
Please see our general article on Google S2S conversion tracking setup HERE.
Here is how you would create the on-page conversion goal (for submits) in Google. Note the two codes I highlight need to be added to your page in <head>. The first is the universal Google tracking code, the second is a custom function that fires a conversion -- we will trigger that function ourselves using my custom code linked above.
Then, here is how you would create the goal for offline importing of conversions, which can be used for our "custom scenario" config in FunnelFlux for Google Ads.
Note at the end how I select the ctId value in the URL -- this is the goal ID that is needed for the custom scenario.
Note: since recording this video, Google has updated their UI a little bit. You should now pick this choice below:
Correct link usage for an MS Ads campaign
Here I go through how you'd generate links for using in campaigns and the correct way to set them in MS Ads (and Google Ads).
Important notes on testing:
- A lot of users encounter "invalid action" errors when testing their funnel. This is because our universal action (clickthrough) links need context. They need to know what funnel you are in, otherwise the tracker doesn't know what to do - it cannot make a decision.
- So, to test, always go to the funnel builder and get a redirect or direct link. If a direct link, copy the "full direct URL". Then, open this link in a new private browsing window to isolate the test. These URLs are what users actually click in ads and are what you need to use for proper testing.
- It is possible to make direct views to e.g.
https://domain.com/landerwork by embedding some defaults, but its not worth it for pages you have created purely for advertising. No one is visiting these pages directly, they all come from ads, so don't worry about it. - Always open new private browser windows for testing. Otherwise existing cookies/sessions can create confusion and eventually cause weird results.
Checking data in reporting
Final steps! Now let's look at the basics of our reporting and how to analyse data.