

This article is just an extension of the original Project Thunderbolt article here.
Please refer to that article for most setup info, then use the additional information here to account for the differences with Google Ads setup (MS Ads and Google Ads are very similar, so there is not much to change).

Different Magic Code
Since you are using Google Ads, the "magic code" I wrote will be slightly different. Namely, we want to fire conversion events to Google instead.
Here is the alternative code, raw code link - HERE
<!-- put your Google global tracking tag, as well as event snippet, in <head> and before this code -->

<script>
//wait for page to be fully loaded
window.addEventListener('DOMContentLoaded', (event) => {
  //fire Google Ads conversion on form submit
  function GetCustomEvent() {
    gtag_report_conversion()
    console.log('Sending conversion event to Google Ads')
  }

  //add listener for Google Ads conversion
  let form = document.getElementById('my_form');
  if (!form){
    let forms = document.getElementsByTagName('form');
    for (const form of forms){
      form.addEventListener('submit', GetCustomEvent);
      console.log(`Adding event listener to ${form}`)
    }
  } else {
    form.addEventListener('submit', GetCustomEvent);
    console.log('Adding event listener to my_form')
  }

  //hide the ff_vid field if present
  let ffVidField = document.getElementById('ff_vid_field');
  if (ffVidField){
    ffVidField.style.display = "none";
  }
})
</script>
Now, before you use this code, note we have to get Google tracking set up properly on your pages AND a conversion event created + added to your page.
I will detail those steps below.

Setting Up Lead/Form Conversion Tracking
Right now, its not possible to easily send sales/conversion data directly to Google Ads, unless you can place their conversion code on the offer (in most cases with affiliate networks, you can't).
An integration is in progress that will allow server-to-server conversion tracking. This will be available soon, at which point I'll update this doc.
But for tracking things like a form submit, which might be the initial action you want to optimise for, we can use Javascript on the page.
To do this, much like with MS Ads, we can hook into the form submit with JavaScript and fire something in the browser. The "Magic Code" above handles this, but you will still need to create some conversion events in Google Ads and get corresponding code.

Step 1: Create a Conversion Action
Inside the Google Ads UI for your ad account, go to the conversions section.
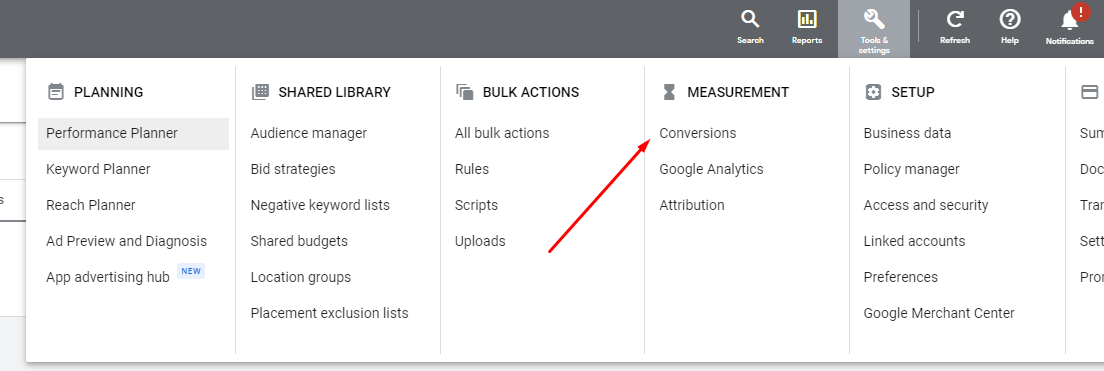
From here, create a new conversion action > pick website as the type.
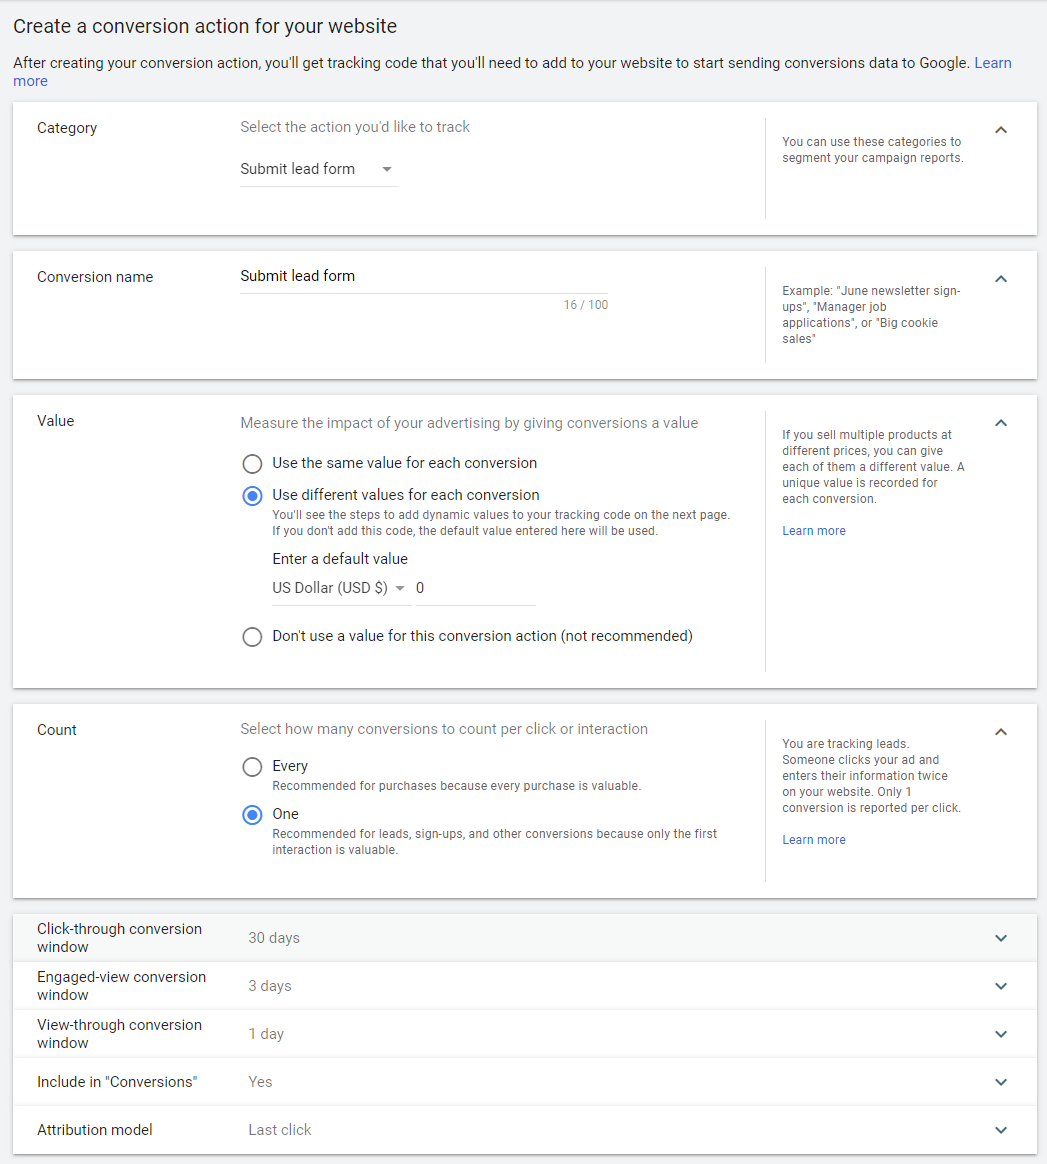
Then, you'll need to fill out details for this conversion event. For an opt-in for example, you can pick the submit lead form category and give it an appropriate name.
For the other parts, you can pick the options as below:

Step 2: Get the Google Ads Conversion Code
On the next step for getting the tag, click the option to install yourself.
Here we will be given a number of code options, depending on how we are tracking things.
If you have not set up any Google tracking codes yet, pick the first option. If you already have Google Analytics installed on pages you can use the second option, and if you already set up some global tag for Google Ads, you can use the last option.
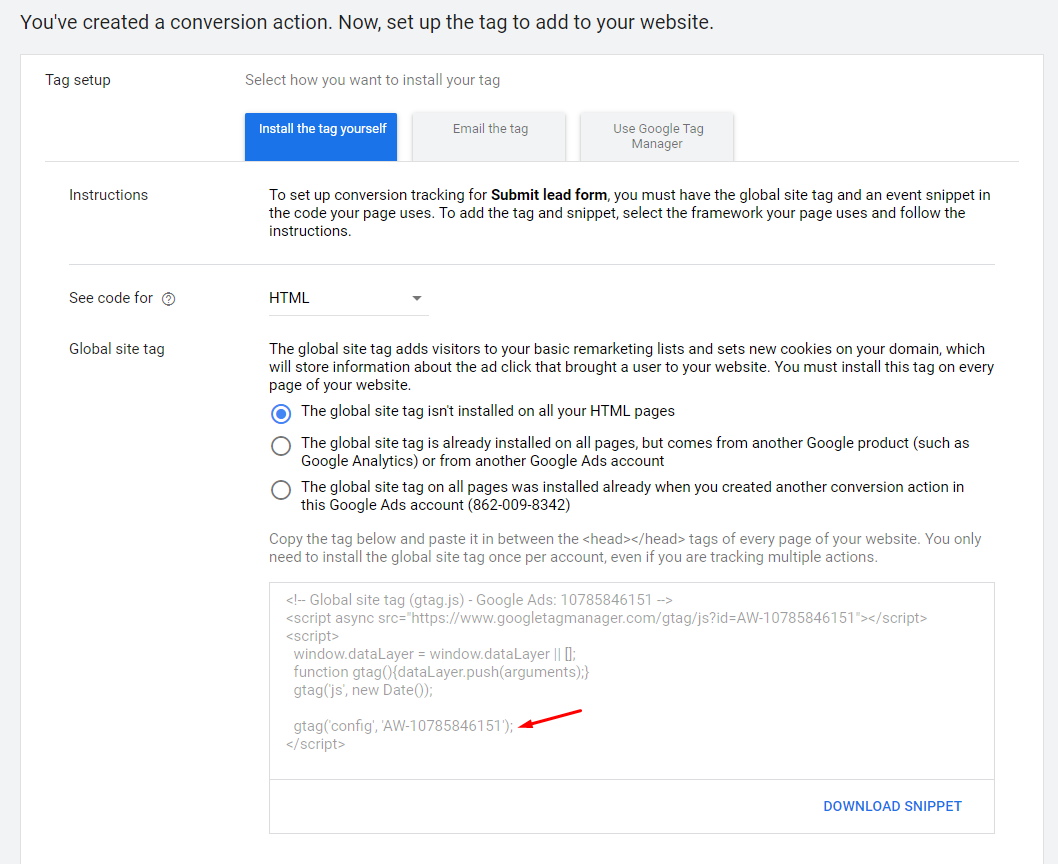
In all these codes one of the main things to note is this gtag parameter which declares your account ID. Whatever approach you use, somewhere on the page, some JavaScript will say "this is my Google Ads conversion ID".
Follow the instructions above where it tells you to put this code in the <head> section of your pages. It should come prior to any other code for tracking.
Now, scrolling down you will find the event code for tracking:
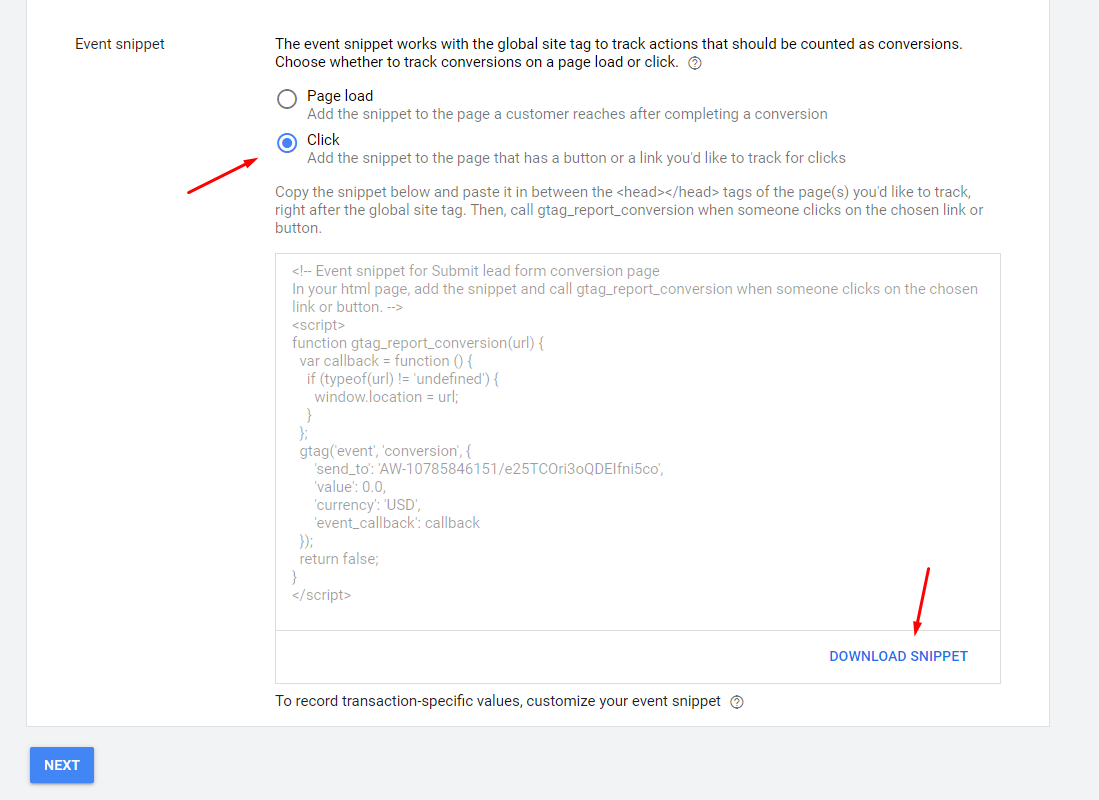
This snippet contains all the code to fire the conversion event to Google.
Take this code and put it AFTER the global code in the previous section. This code above should also be in <head> and should come before the "magic code" I have given above, as well as FunnelFlux view tracking code.

Step 3: Implement Form Submit Tracking
For this, I would recommend using the "magic code" I have earlier.
Just paste it on your page in <body>. It will wait for the content of the page to load, then will do a bunch of things.
One of the notable things it does here is "listen" for form submits, and when they happen, it triggers gtag_report_conversion(), which is what sends the conversion action to Google Ads.
Want to check if everything has been implemented properly?
If you open your dev tools in your browser (hit F12) and go to the console tab, you can then submit your form. You should see a message "Sending conversion event to Google Ads" posted in the console if it worked correctly.
If you have any doubts, just reach out to support -- we know this stuff can be tricky.

Google Ads Configuration
The Google Ads interface is quite similar to Microsoft Ads.
It's critical, as with MS Ads, to understand these points:
- With Google Ads, you cannot use redirect links for your ad URL (the ones with /fts/ in them). These will get rejected as you are required to have a single destination for your ad URL with no domain changes. Thus, you are forced to direct link to a landing page and use our JavaScript to track the arriving visitor
- If you want to split-test initial landers, you'll need to make multiple ads to do this
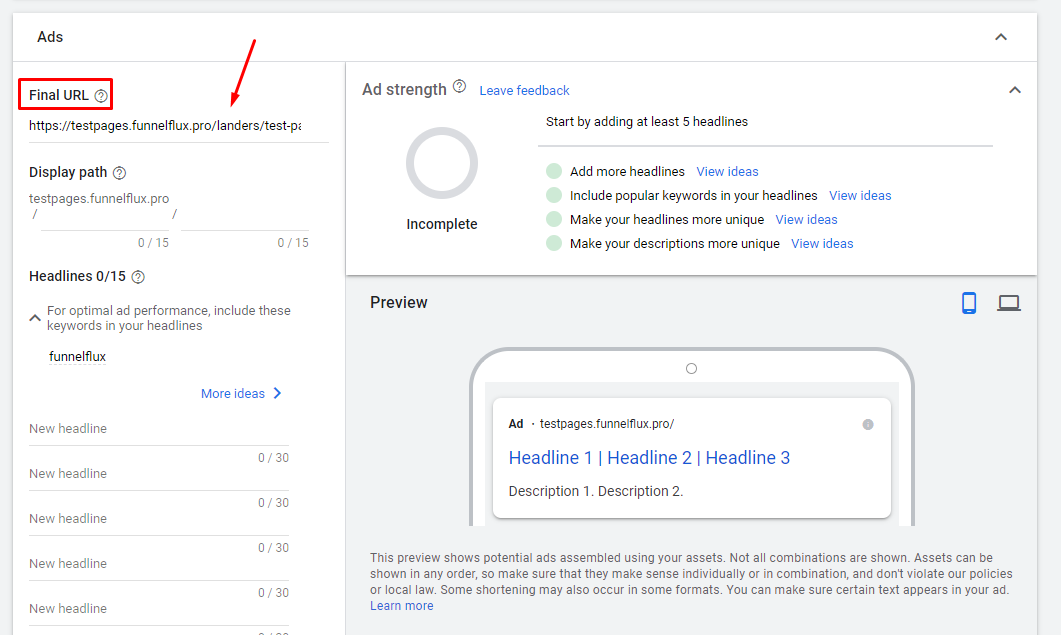
- Your ad's final URL should be the URL of your page itself
- You then must pass additional data in the "final URL suffix"
- You should not put anything in the "tracking template" box
Starting from a funnel in FF Pro, you would click your landing page > go to the JS tracking tab, then pick Google Ads.
You should get a direct URL to use, as well as the JavaScript code that you should put on your lander (for our tracking).
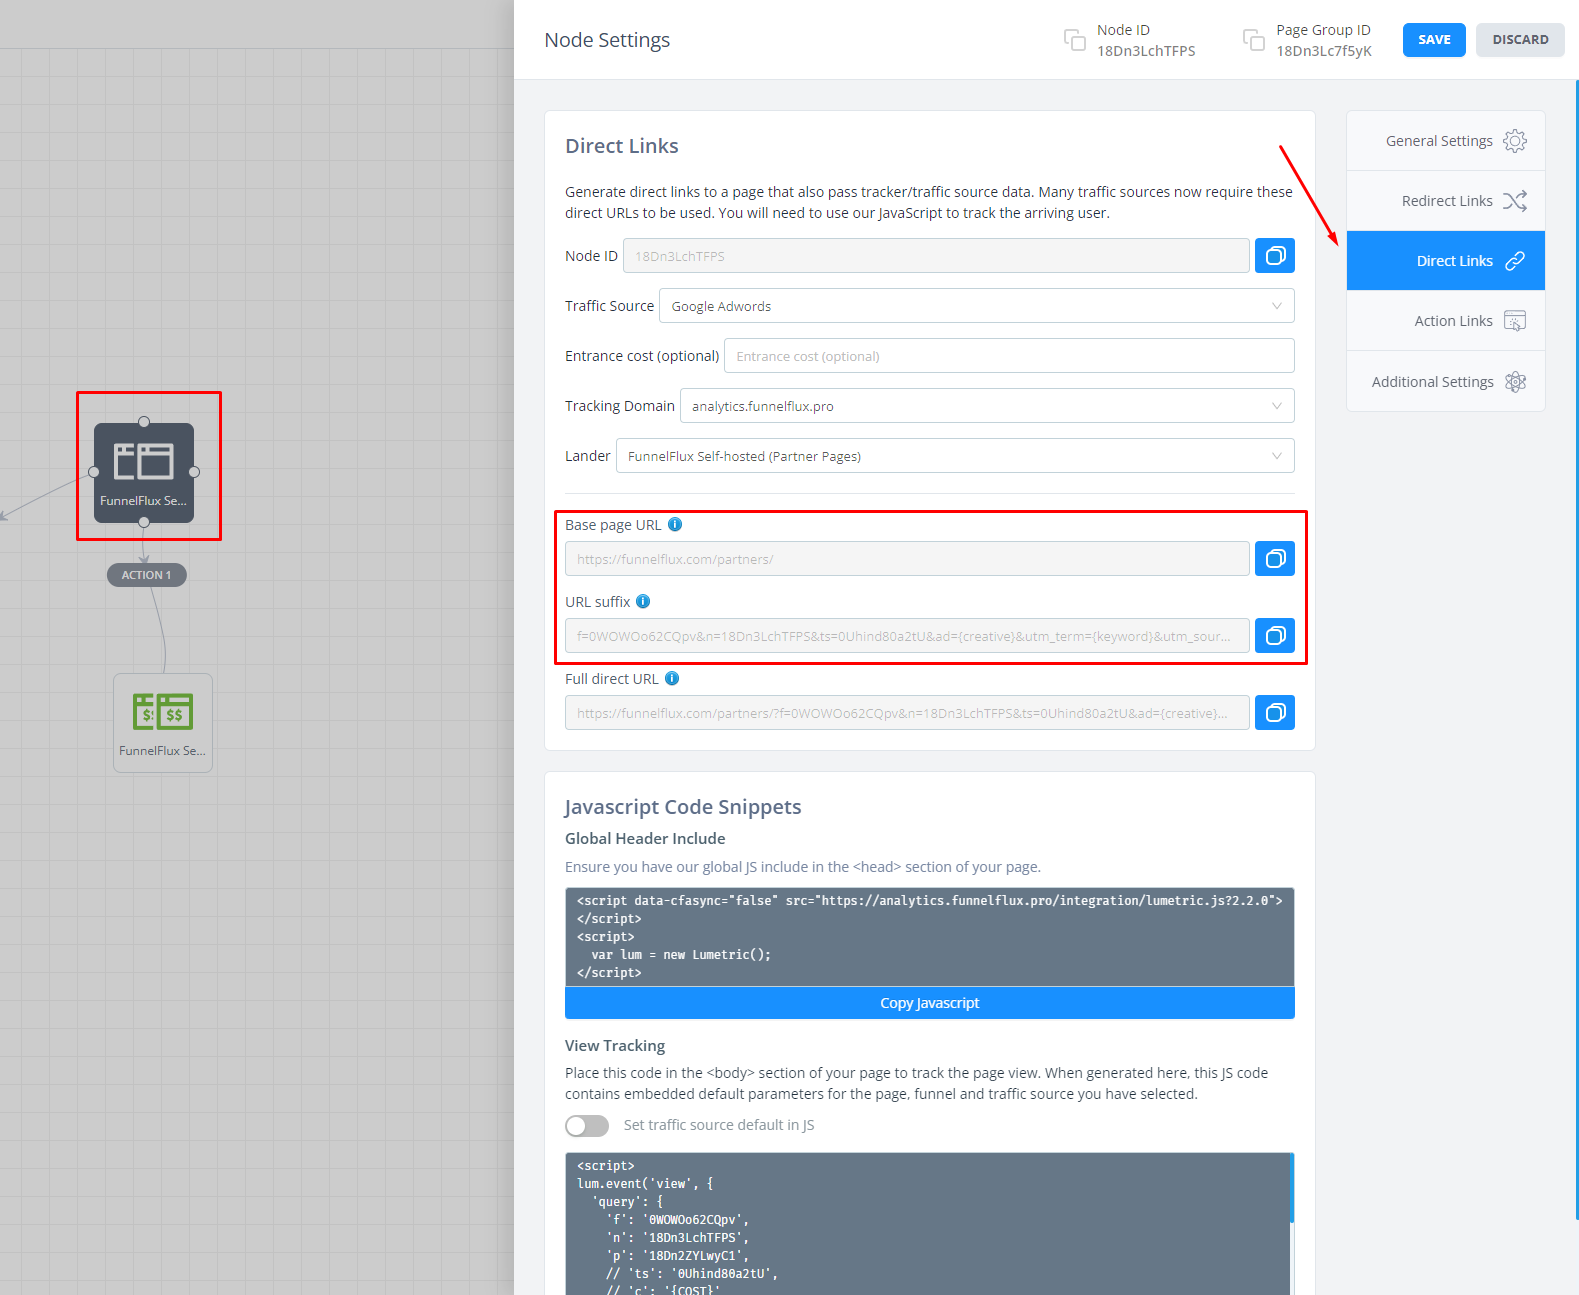
Above, my example full direct URL given is this:
https://funnelflux.com/partners/?f=0WOWOo62CQpv&n=18Dn3LchTFPS&ts=0Uhind80a2tU&ad={creative}&utm_term={keyword}&utm_source=google&utm_medium=search&utm_content={adgroupid}&match={matchtype}&device={device}Well, bit of a mouthful! What we want to do here is split this into the page and the query parameters, which start after the ? symbol.
We conveniently do that for you already, giving you the base URL and URL suffix.
The base page URL is the naked page and this is what we want to use as the Final URL in the Google Ads UI. For example:
https://funnelflux.com/partners/
The URL suffix part is our URL parameters, which we need to put in the Final URL Suffix. For example:
f=0WOWOo62CQpv&n=18Dn3LchTFPS&ts=0Uhind80a2tU&ad={creative}&utm_term={keyword}&utm_source=google&utm_medium=search&utm_content={adgroupid}&match={matchtype}&device={device}Here is what this looks like in the Google Ads UI -- note what you see may differ depending on the section, ad type and so on:
and then further down:
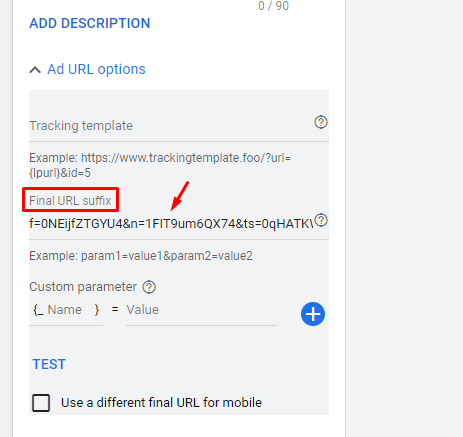
Note again how we leave tracking template blank. This is a common mistake and putting a URL here will make your tracking not work correctly.
That's about all there is to it!
So, to recap:
- You need to use our JS to track arriving visitors
- You must get the direct URL by clicking a page in the funnel > JS tracking. This URL will be your lander + params, it will not be a redirect link with /fts/ in it
- In the Google Ads UI, use the initial part of the direct URL as the ad URL, then put everything after the ? in the final URL suffix area
Happy tracking!